Blog Monarch Overview
Monarch Retail POS Software Overview
Here you will find everything you need to know about Monarch Retail POS Software, our cloud-based system. This 5 lesson plan is designed to provide you with the skills and knowledge needed to get your Monarch Retail POS system ready to accept transactions from your customers.
► Company Profile Setting
Lesson 1: Inventory
Lesson 2: Supported Hardware
Lesson 3: Payment Processing
Lesson 4: POS Settings
Lesson 5: Sales
Company Profile Setting
When you log into your Monarch Retail back-end for the first time, you're required to set up your company profile to get the software to recognise who you are. Follow the steps below to get started.
NOTE: This material is designed to complement a Monarch Retail POS onboarding session. If you're viewing this content and have not yet had an access to the software. please contact our team to register: email info@mavericktechnology.co.nz
or call 09 282 3127 / 0800 030 494
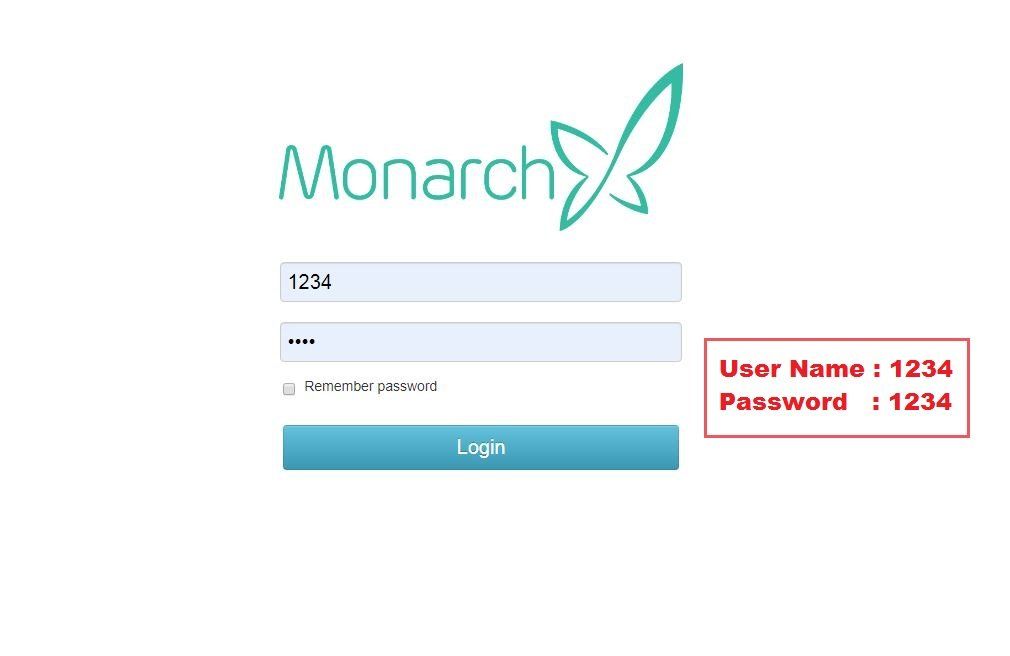
1. Login with the User Name and Password
2. Click System on the top on the page
3. Click Company profile on the left menu
4. Fill in information needed
5. Click the Save button to finish

Lesson 1: Inventory
Inventory is designed to help you transition easily to Monarch Retail software. You can add products to your inventory in two different ways before you can Create POS Product Buttons;
However, there are two areas you need to take care of before products can be generated;
(1) Create Product Categories(2) Create Warehouse Detail
NOTE: To keep your new products organised in your inventory, you'll need to create your product categories and warehouse detail before you can import product sheet or manually create them. You will benefit from doing so when the time comes to run reports and inventory checking.
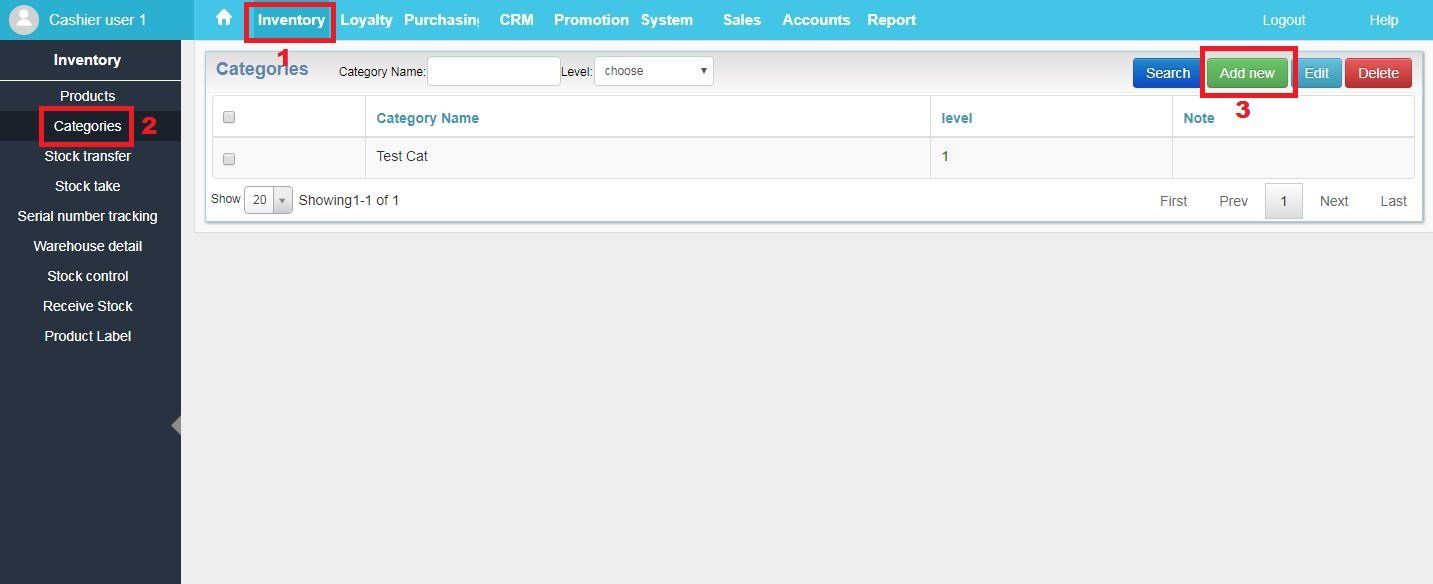
(1) Create Product Categories
1. Once you are done with setting up the company profile, click Inventory
on the top menu
2. Click the Categories
on the left menu
3. Click the Add New
button on the top right corner
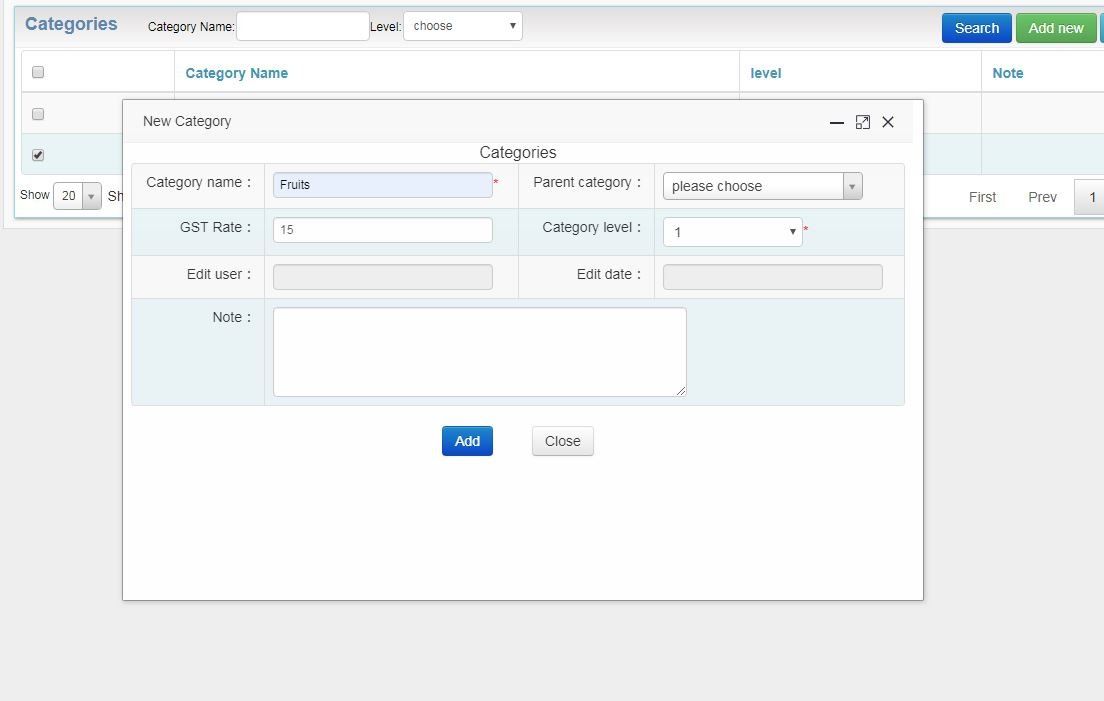
4. Fill in information needed
5. Click the Add
button to finish. Now you can move on to Create Warehouse Detail
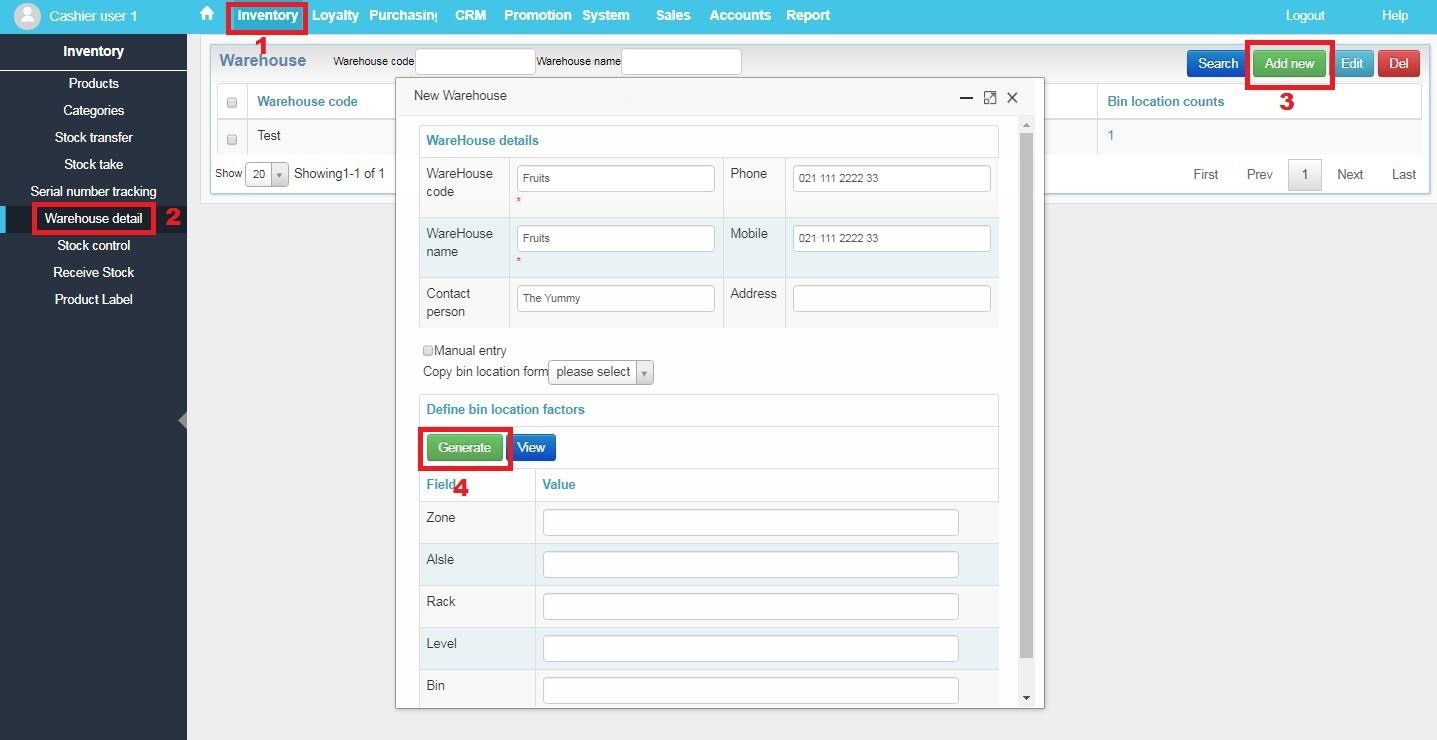
(2) Create Warehouse Detail
1. Click Inventory
on the top menu
2. Click Warehouse detail
on the left menu
3. Click the Add New
button on the top right corner
4. Fill in the information needed, then click the Generate
button to finish
Now you are ready to put your products in the correct places.
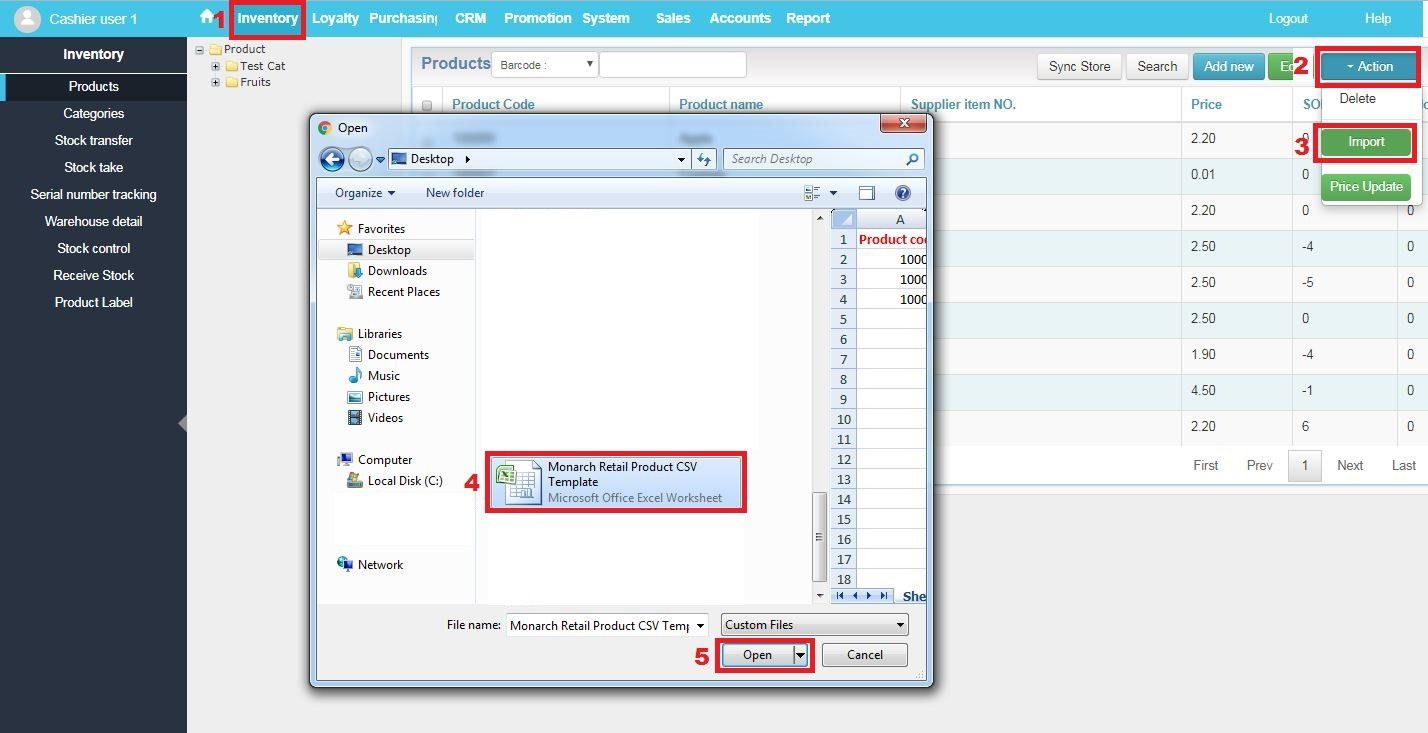
a. Import Inventory
This method is suitable for both existing and new retailers. If you have the inventory spreadsheet from your previous point of sale system, or if you are a new retailer who is starting everything from the beginning, you can copy your product information onto our Monarch Retail Product CSV template file based on our requirements and upload it onto the software.
1. Click Inventory
on the top of the menu
2. Click Action
on the top right corner
3. Select the Import
button from the drop-down box
4. When the new window pops up, look for the Monarch retail Product CSV file* from where you saved it
5. Click the Open
button to start the process
*We recommend you to save it on desktop for the best time-saving when you are looking for it
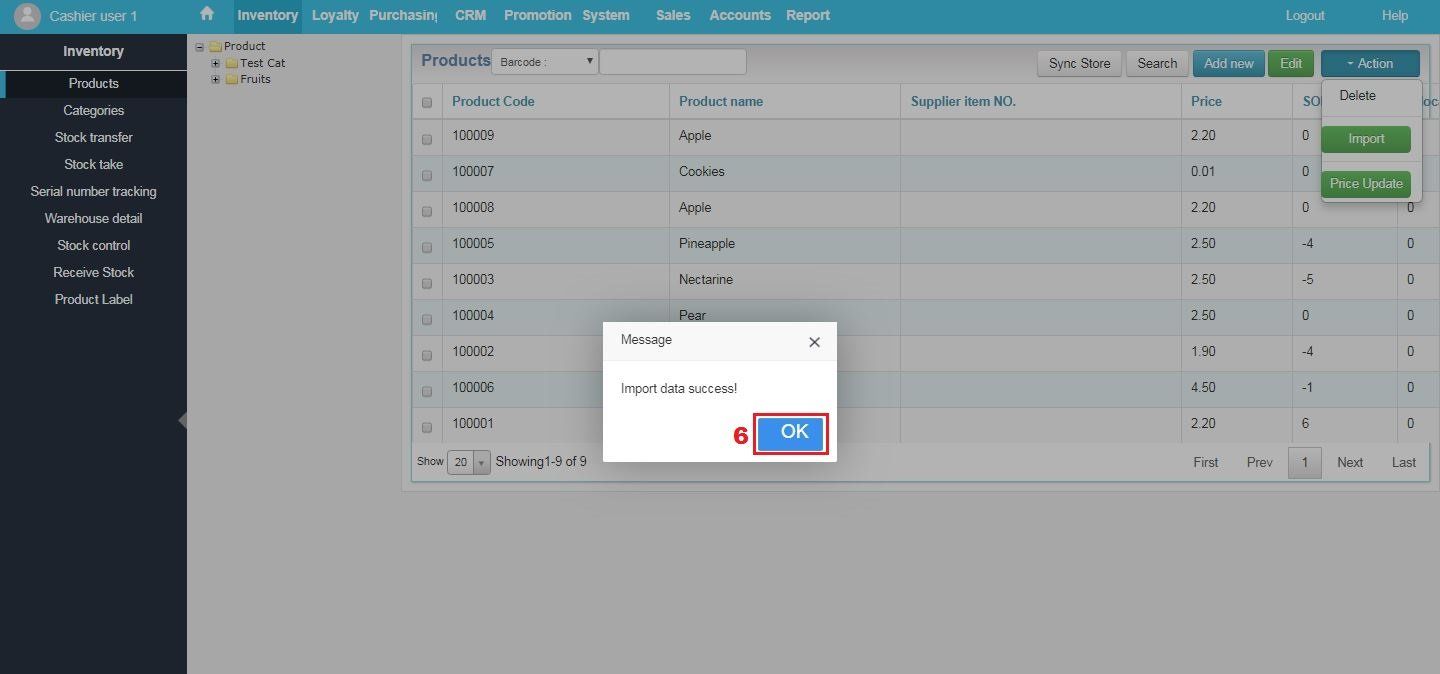
6. Once you are finished, you will see the message pop up, click the OK
button to finish
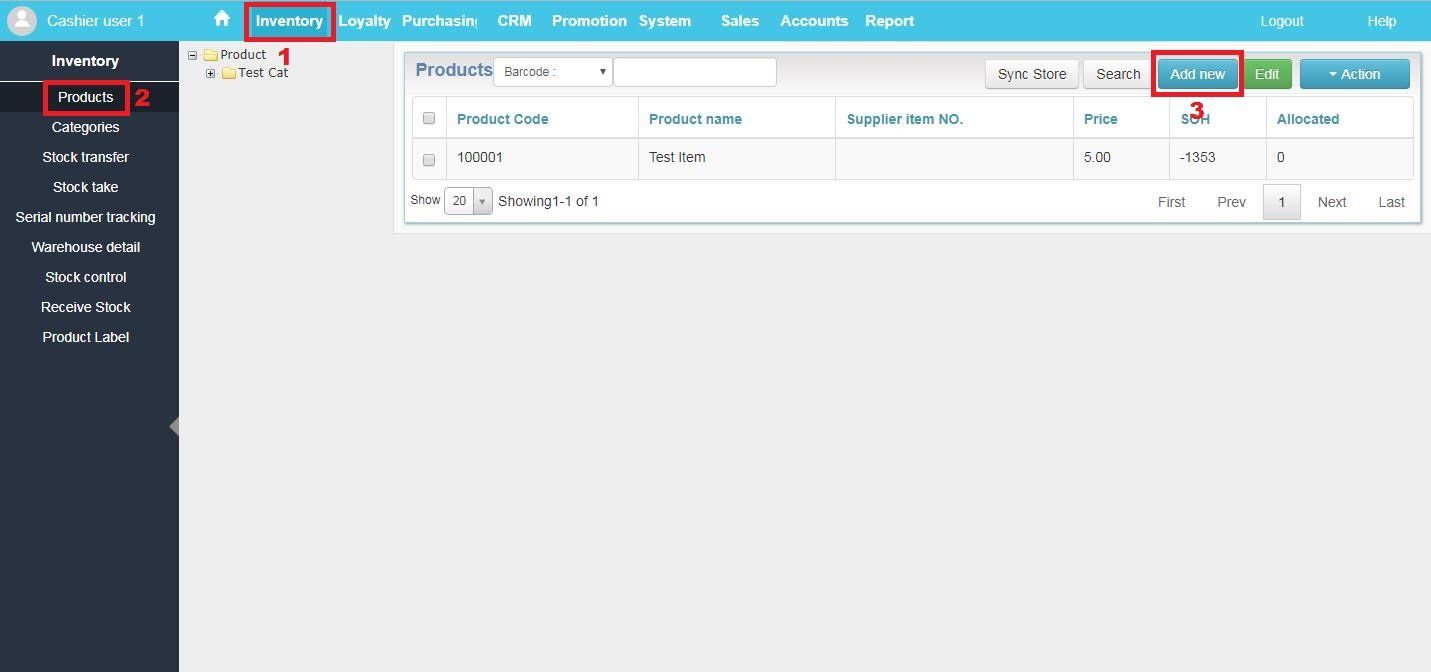
b. Create Products Manually
Creating products manually is recommended for new retailers or the existing ones who want to add new products.
NOTE: To keep your new products organised in your inventory, you'll need to create your product categories and warehouse detail before you can create them manually. See Create Product Categories
and Create Warehouse Detail.
1. Click Inventory
on the top menu
2. Click Products on the left menu
3. Click the Add
button on the top right corner
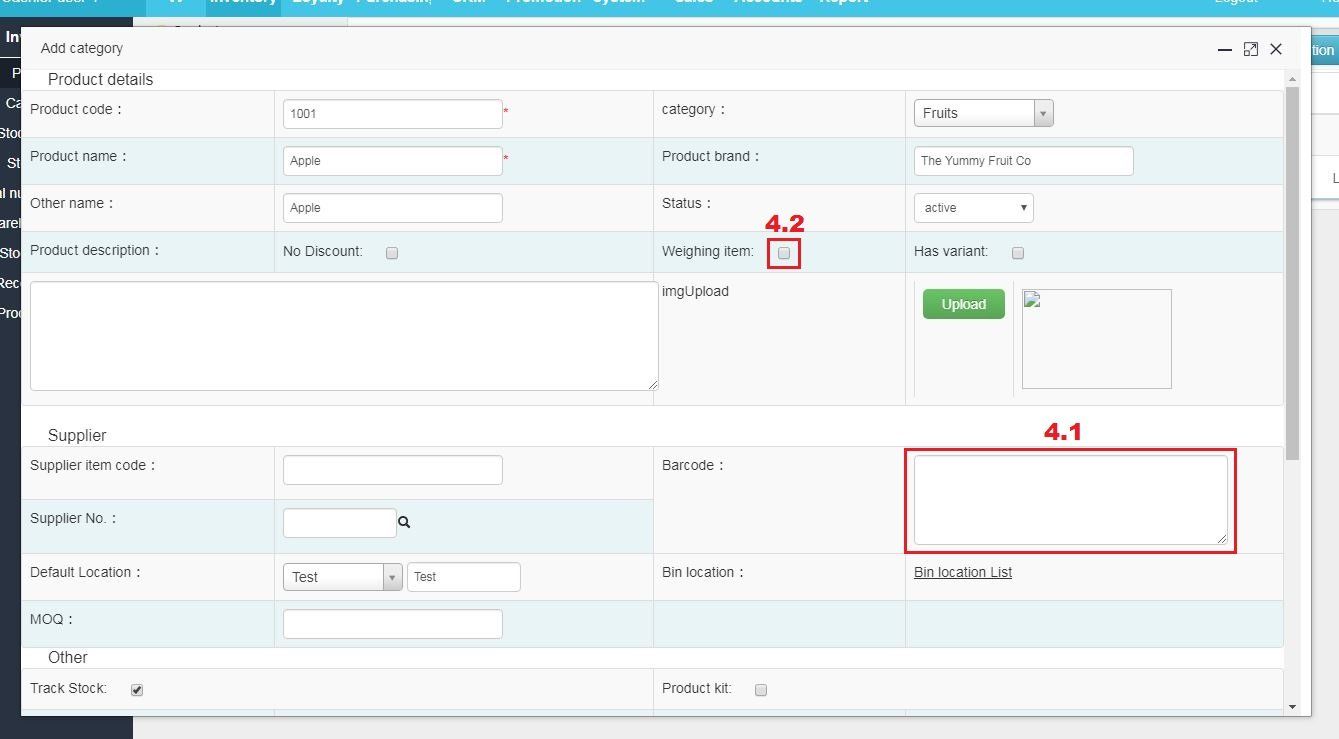
4. Fill in all the information needed.
Optionally, if you need your product to be scanned or weighed, follow the instructions below
How to Setup Scanning and Weighing Products
Scanning Product
4.1 Click the Barcode box on the right side and scan the product with a scanner
Weighing Product
4.2 Tick the Weighing item box on the right side
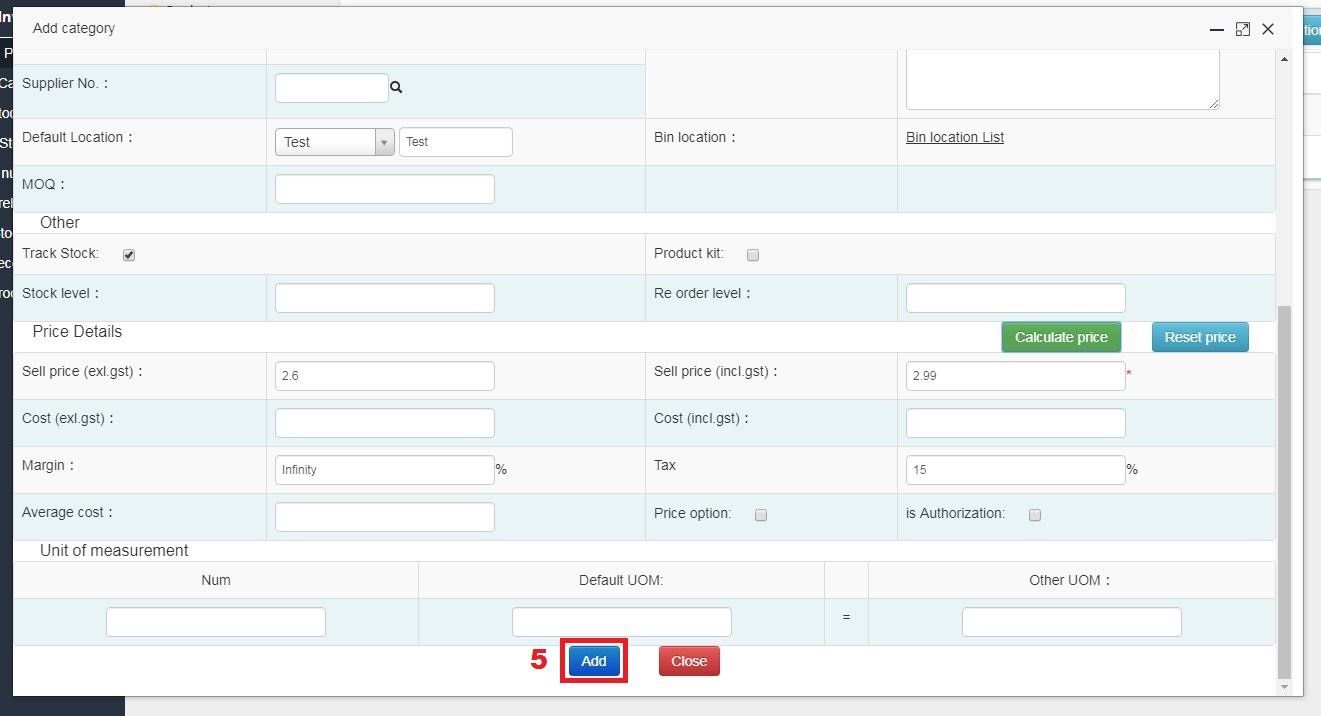
5. To finish creating the product, scroll down to the bottom and click the Add
button
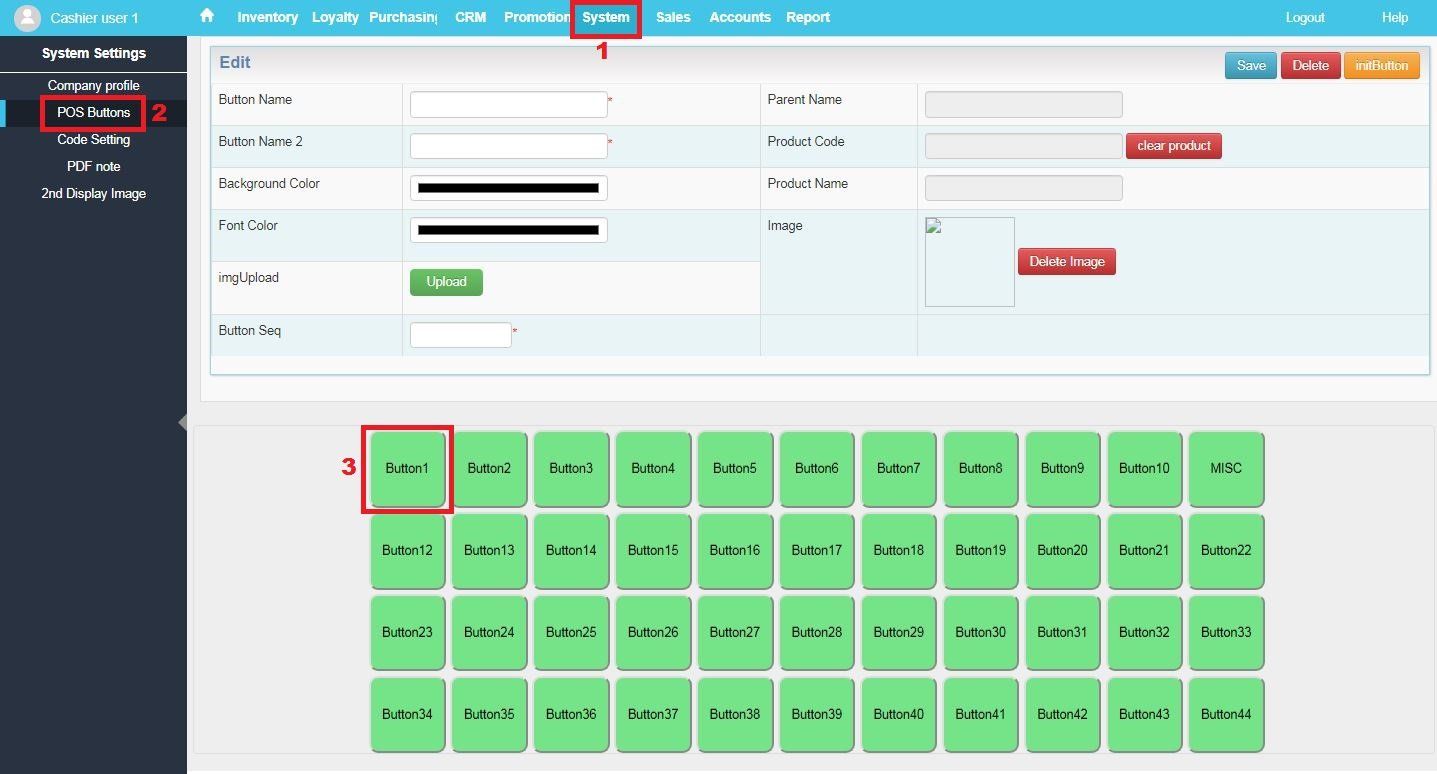
Create POS Product Buttons
1. Click System
on the top menu
2. Click POS buttons
on the left menu
3. Double click on the button you want to create
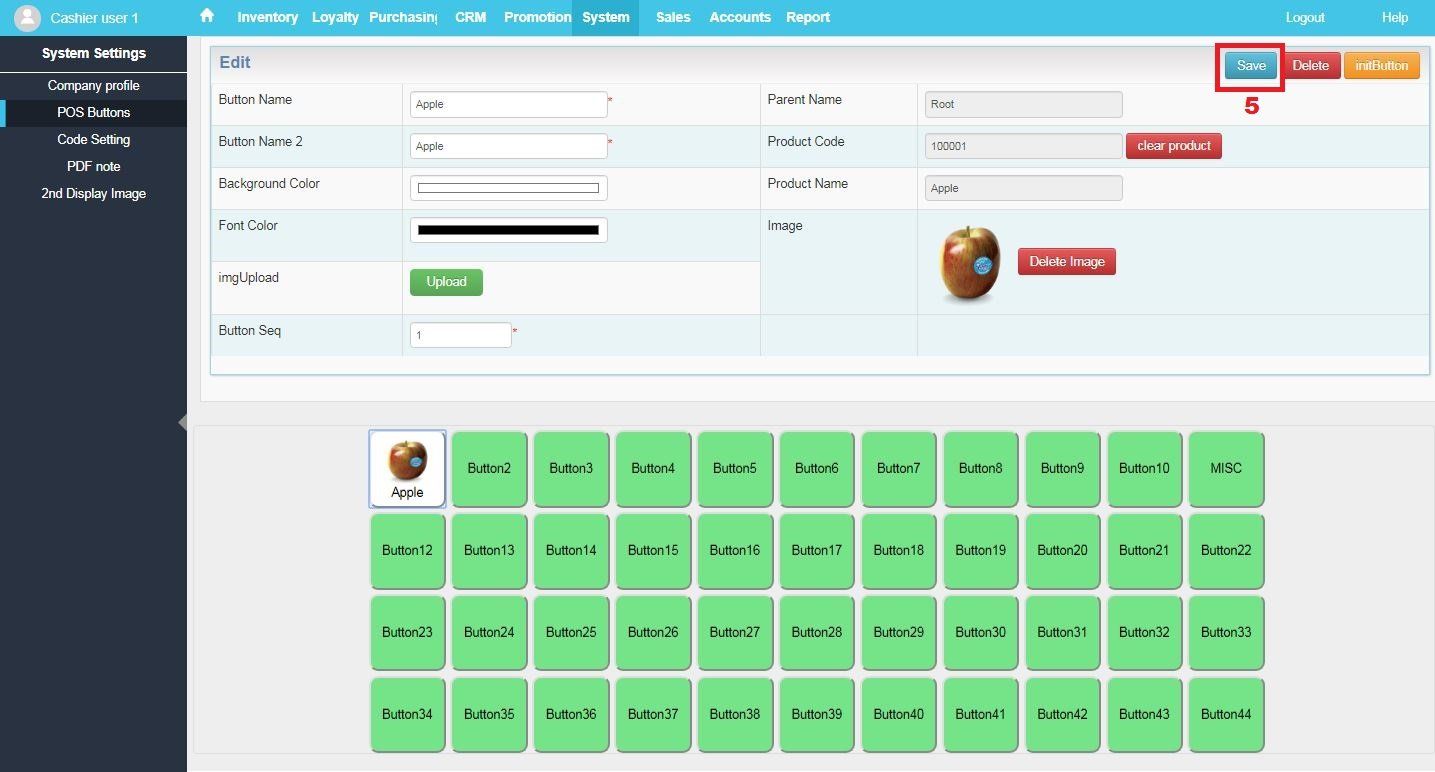
4. Fill in all the information needed
Optionally, if you want to upload an image, image size :
520 x 420 .png in transparent
5. Click the Save
button on the top right corner, then refresh the page to finish
Lesson 2: Supported Hardware
We recommend using our supported hardware listed in this section for your Monarch Retail Software setup. It's the best way to optimise the functioning of your software and get the most out of its features.
If you would like to purchase hardware from us, please email info@mavericktechnology.co.nz
or call 09 282 3127 / 0800 030 494 to discuss our options.
Touch Screen POS PC
A touch screen display takes the place of your regular monitor and lets associates ring up sales quickly using touch input instead of a keyboard and mouse. You can choose between any touch screens on the market that are compatible with Windows operating systems listed below.
- Windows 7
- Windows 10
Receipt Printers
Our Monarch Retail Software is designed, built, and tested to work well with any receipt printer that has Windows Driver together with USB/Serial/Ethernet connections.
List of Services
Eftpos Terminals
Our supported Eftpos terminals are listed below, depending on how you want to take the payment from your customers. If you are not sure about which type of the Eftpos would suit your business best, talk to our specialist
List of Services
Barcode Scanners
Monarch Retail POS solution is supported any kind of barcode scanners, whether they are wire or wireless (Bluetooth), 1D or 2D, as long as it can be connected to Windows, you are good to go.
All you need to do is plug the barcode scanner or the base into an available USB port on your computer, both models do not require software installation or reconfiguration.
Scales
List of Services
Cash Drawers
Cash drawer is generally ready to use right from the box as it doesn't need to be directly connected to your device. In fact, it is only connected to your receipt printer if you want it to open automatically when you complete a sale. Otherwise, simply use the available key to manually open or lock your cash drawer.
List of Services
Lesson 3: Payment Processing
This payment processing section will cover the difference between integrated and non-integrated payment processing, and the default payment types that Monarch Retail Software is supported.
Integrated Payment Processing
With Monarch Retail POS software, you can integrate your Eftpos with your POS. This means, the sale total in your POS is sent to the Eftpos terminal when it's time to process the payment. Reduces keying errors and saves on Eftpos paper rolls.
To set up integrated Eftpos payment processing on POS, please see Eftpos Setting.
Non-integrated Payment Processing
If you are using a non-integrated payment processing such as standalone or mobile Eftpos, no setup is required in Monarch POS software. Instead, during a sale transaction, you need to manually enter the sale total on the Eftpos terminal when it is time for your customer to pay. In order to record the payment, you need to manually select Eftpos payment type when the sale is completed.
Payment Types
Monarch Retail Software has the following default payment types;
- Cash
- Debit Card
- Credit Card
- WeChat Pay
- Ali Pay
- Voucher
NOTE: Whether you plan on configuring your Retail software for integrated or non-integrated payment processing, the above payment types are all you need.
Lesson 4: POS Settings
Setting up the POS terminal is a must for all first time users, otherwise please see
Day Start.
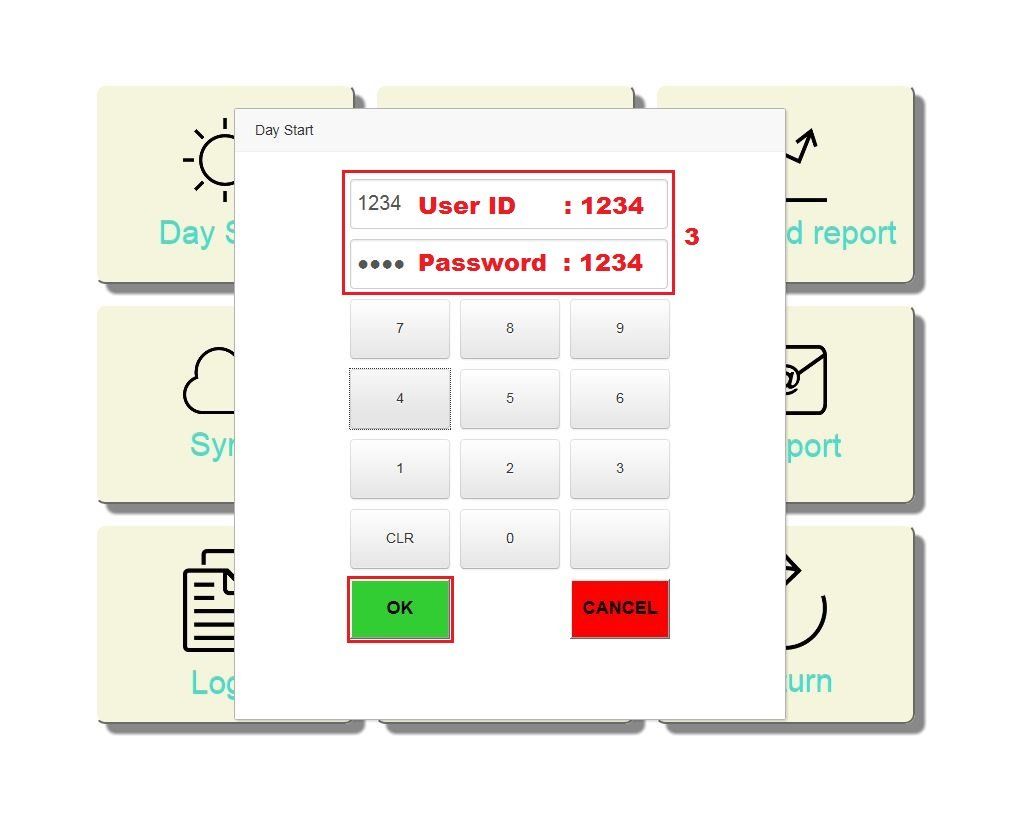
POS Terminal Setting
1. On POS, login page, click the Menu
button on the lower right corner

2. When the main menu page comes up, click the Settings button

3. Key in User ID and Password, then click the OK
button
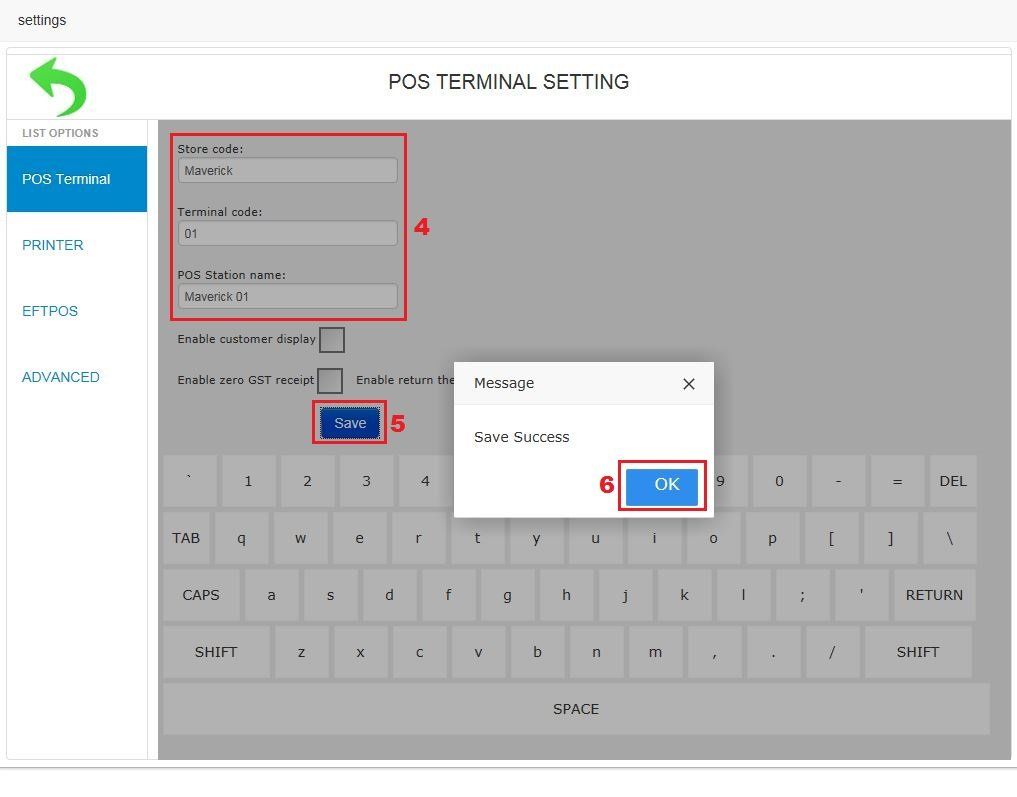
4. Fill in information needed
5. Once you are done, click the Save
button
6. Click the OK
button to complete
At any point, if you want to return to the main menu, click the green arrow on the top left
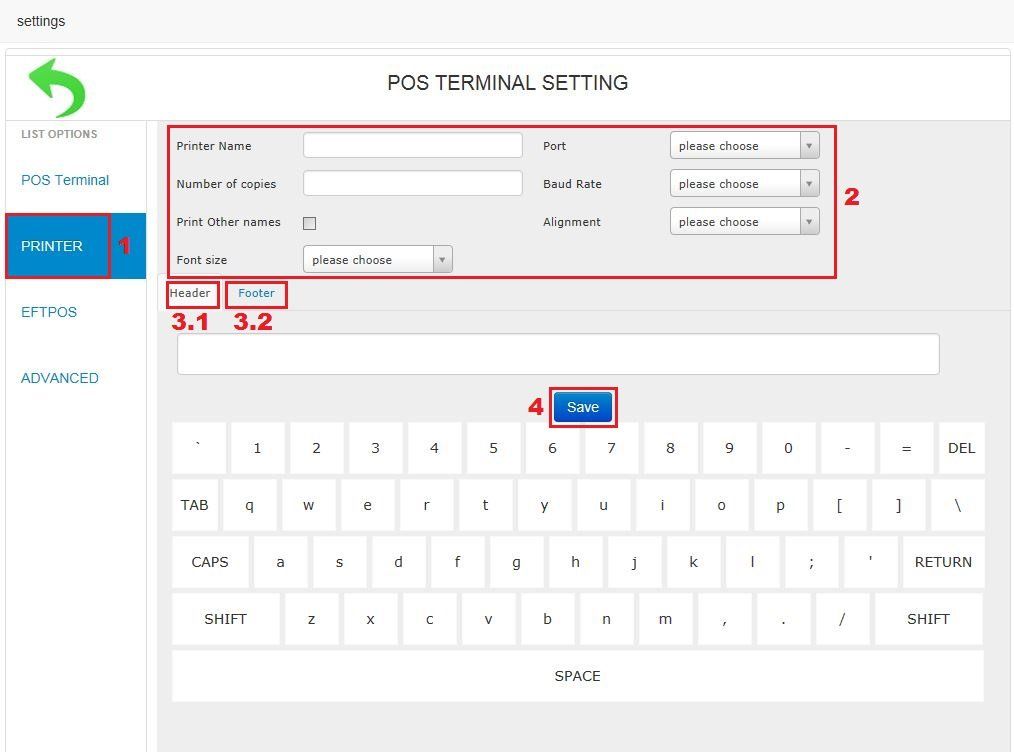
Printer Setting
1. Click PRINTER
from the left menu
2. Fill in information needed according to your printer that you will be using
Optionally, if you want to put GST No. or messages on every receipt printed
3.1 Click Header and enter your company name, address, contract information, GST No.3.2 Click Footer to enter note/messages (e.g. Thank you for shopping with us!)
4. Click the Save
button to finish
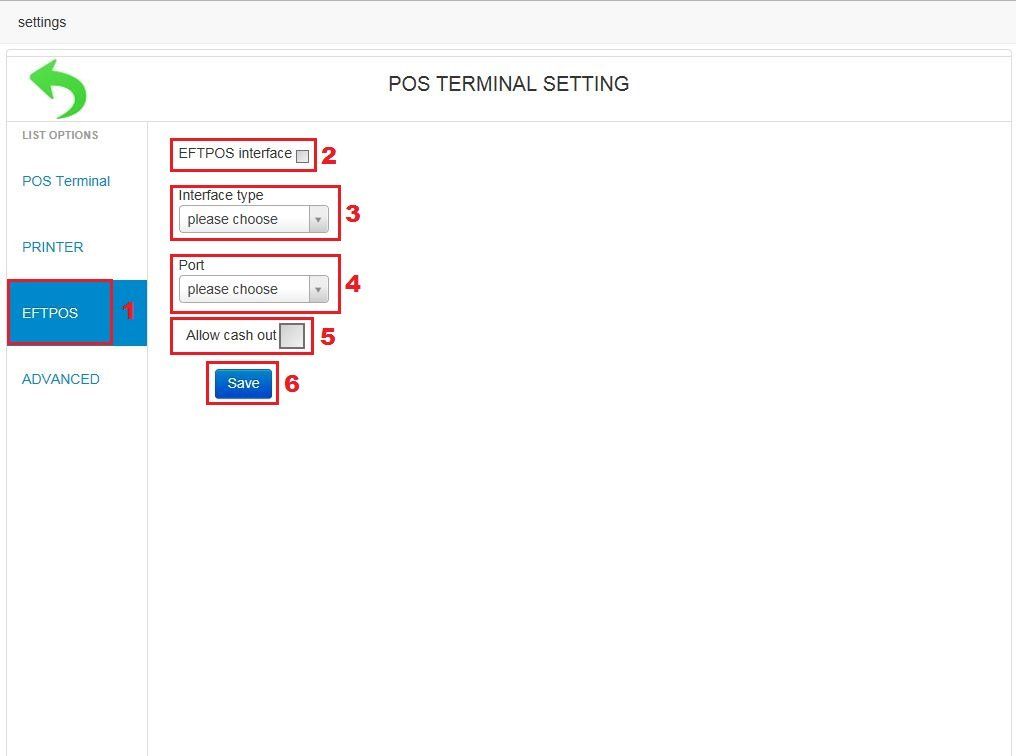
Eftpos Setting
To be able to setup this function, please see supported Eftpos Terminals
before you start.
1. In POS Terminal Settings page, click EFTPOS
from the left menu
2. Tick the EFTPOS Interface
box if you would like your Eftpos to be interfaced, otherwise leave it un-ticked
3. Select which interface type
you will be using from the drop-down box
- Verifone
- Vault
- Ingenico
- DPS EFTPOS
4. Select which Port you will be plugging the Eftpos cable into from the Port drop-down box
5. Tick the Allow cash out
box if you will want to do cash out for customer, otherwise leave it un-ticked
6. Click the Save
button to finish
Scale Setting
To be able to setup this function, please see supported Scales and how to create Weighing products
before you start.
1. Click ADVANCED
from the left menu
2. Click Scale
from the top menu
3. Fill in information needed, according to which scale you will be using
4. Click the Save
button to finish

Lesson 5: Sales
The sales section is created to ensure you have all the necessary information to run your store from opening to close. It will also help you establish your store's daily routine and train your employees.
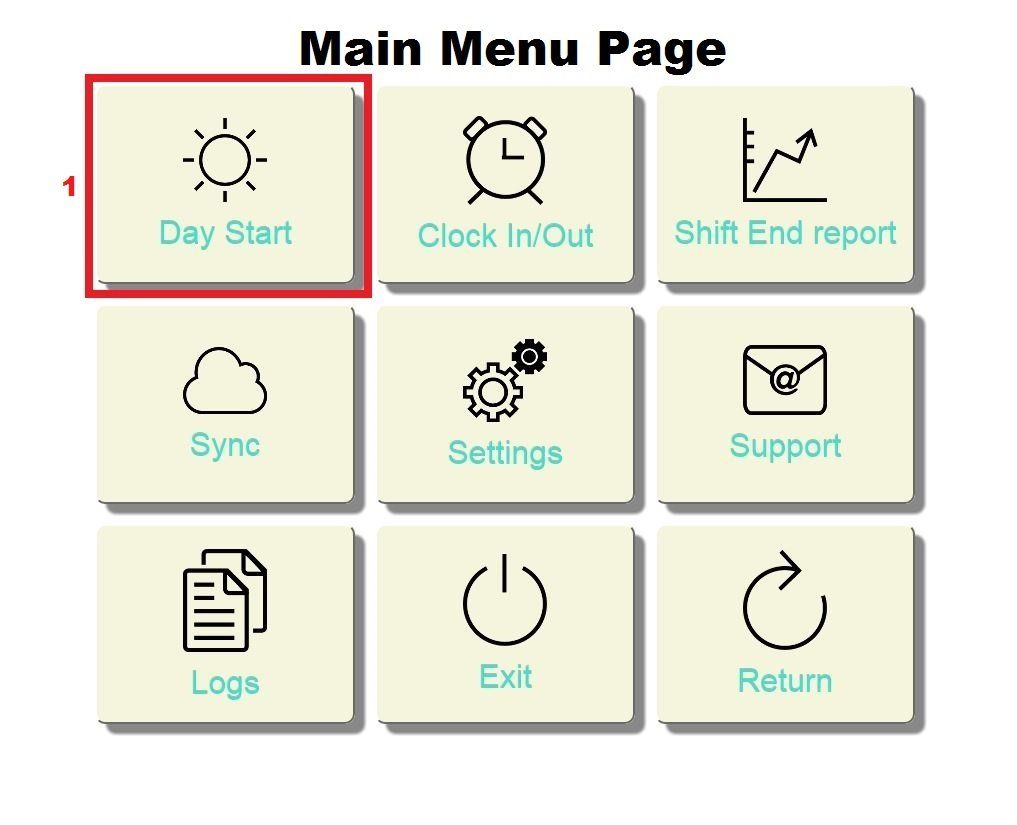
Day Start
1. On the main menu page, click the Day Start
button
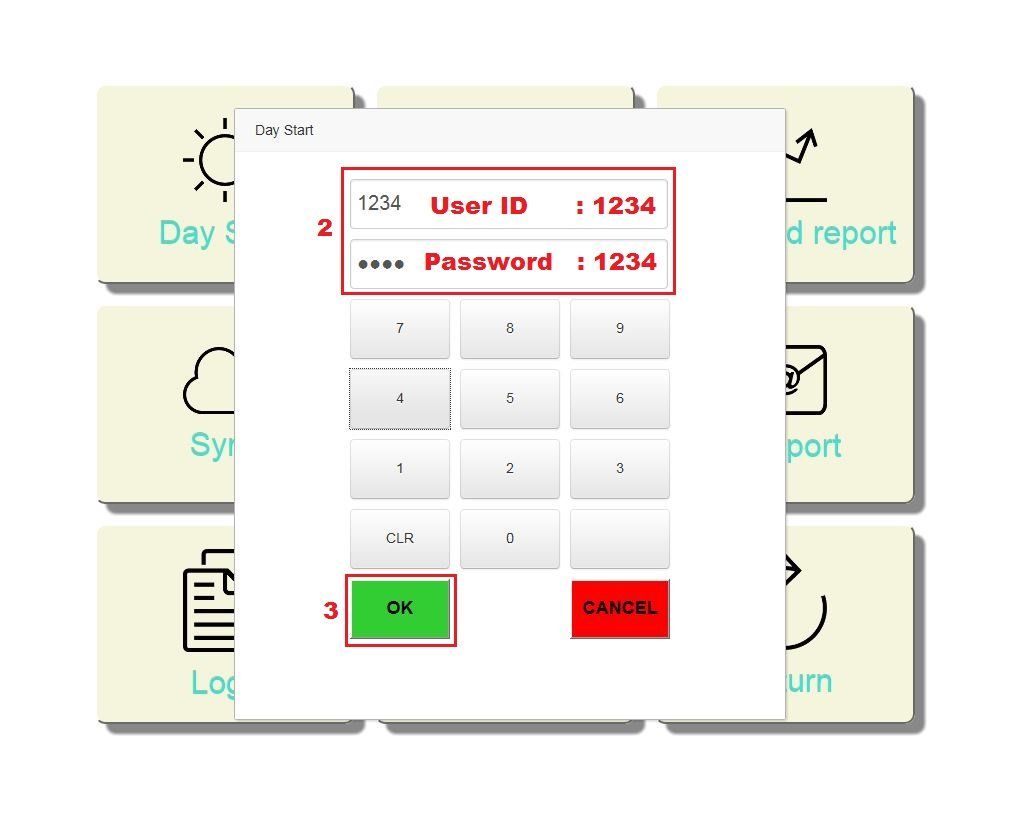
2. Key in User ID and Password
3. Click the OK
button
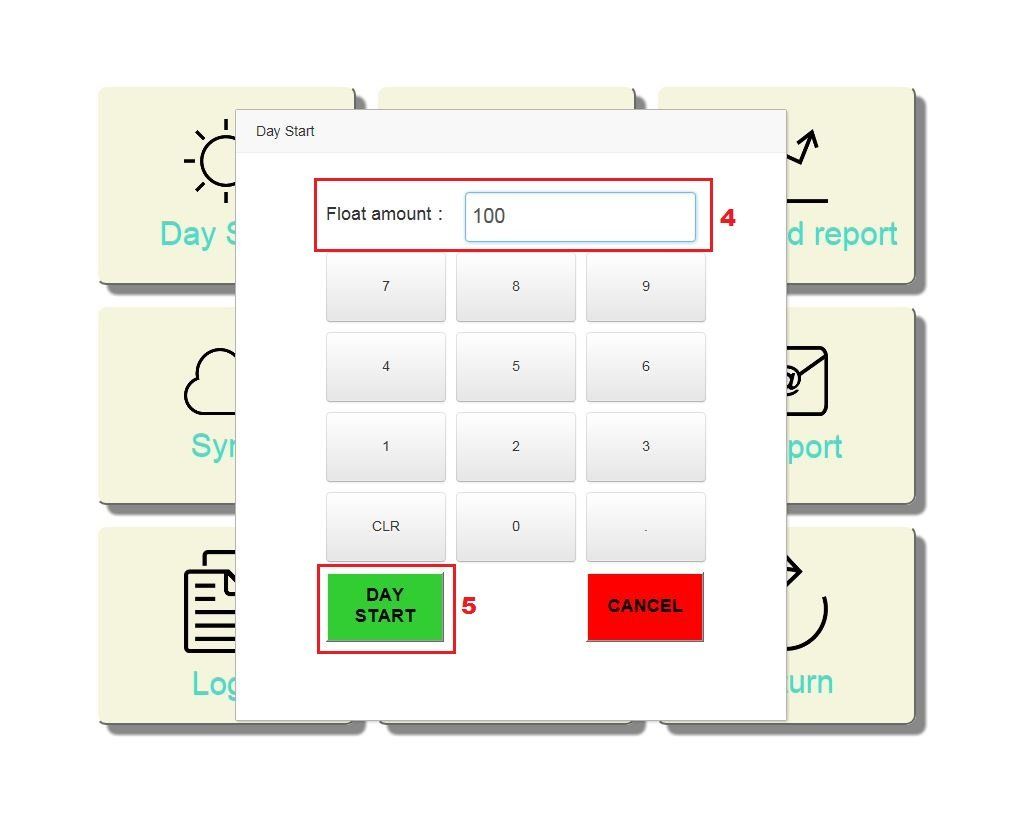
4. Enter Float Amount (meaning cash in the cash drawer - you may enter any amount from 0)
5. Click the DAY START
button
6. Once you are back at Main Menu page, click the Return
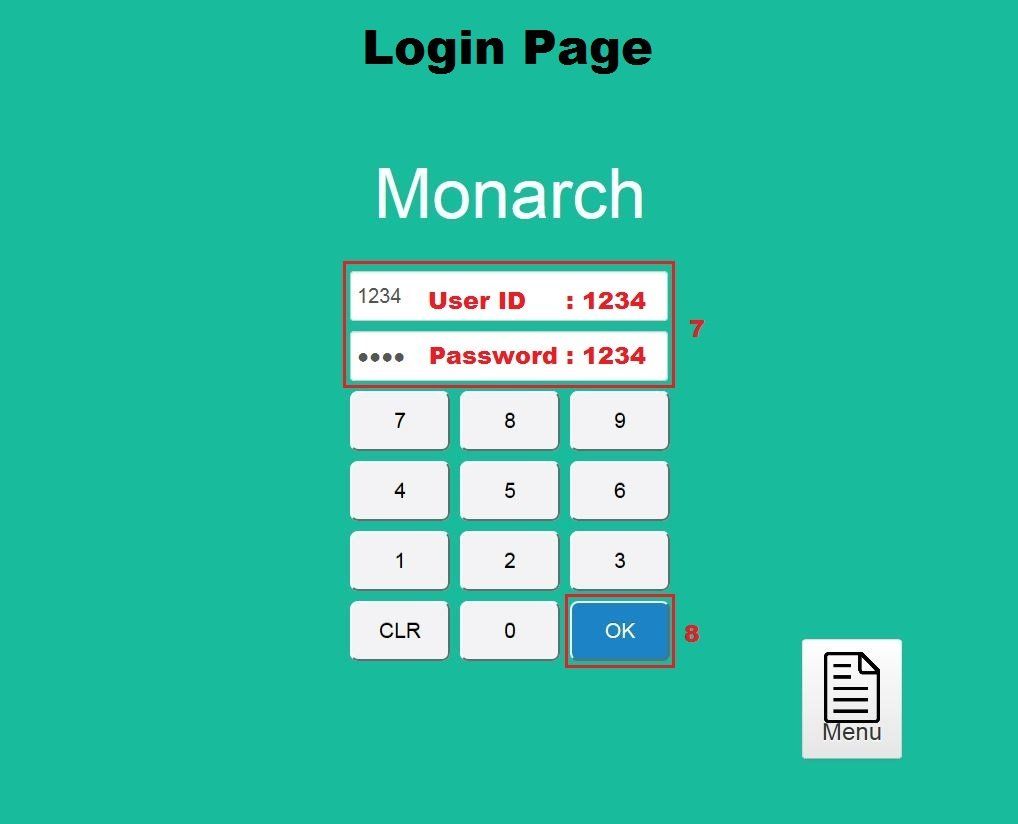
button to go to the Login Page
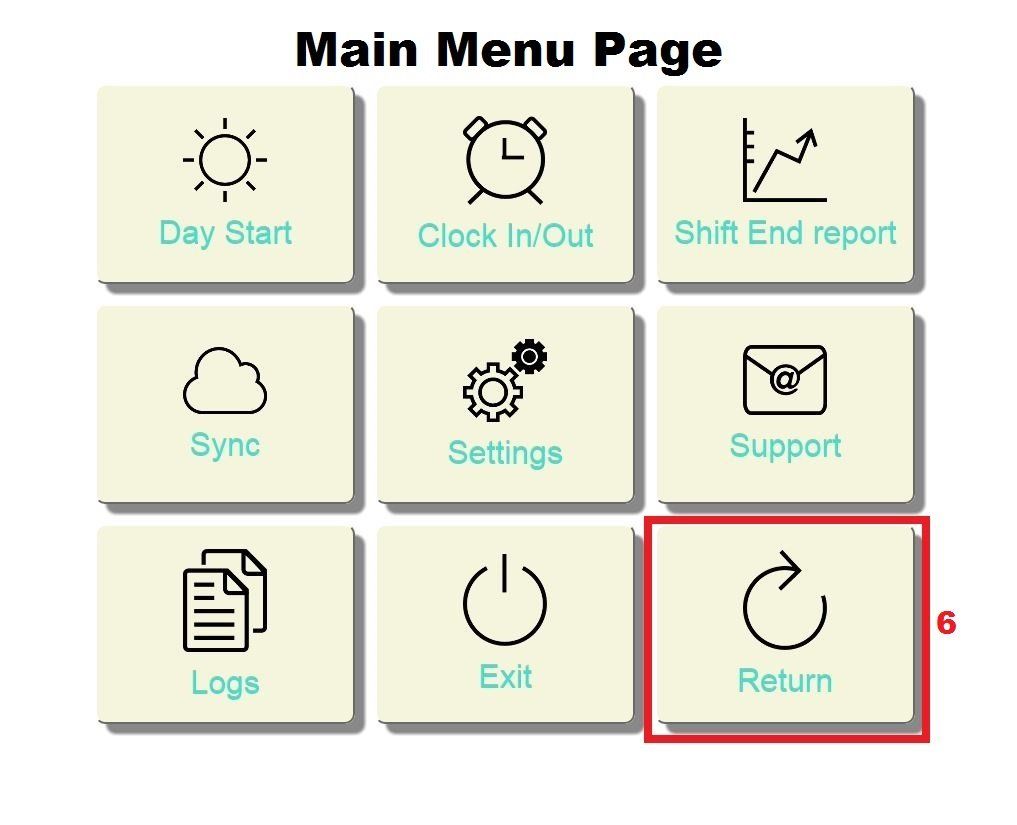
7. On Login Page, key in User ID and Password
8. Click the OK
button, you will then see Sale Page

Basic Sales
Providing the best checkout experience and driving up sales is important. There are three basic payment options included in this section;
1. Pay by Cash2. Pay by Eftpos
Pay by Cash
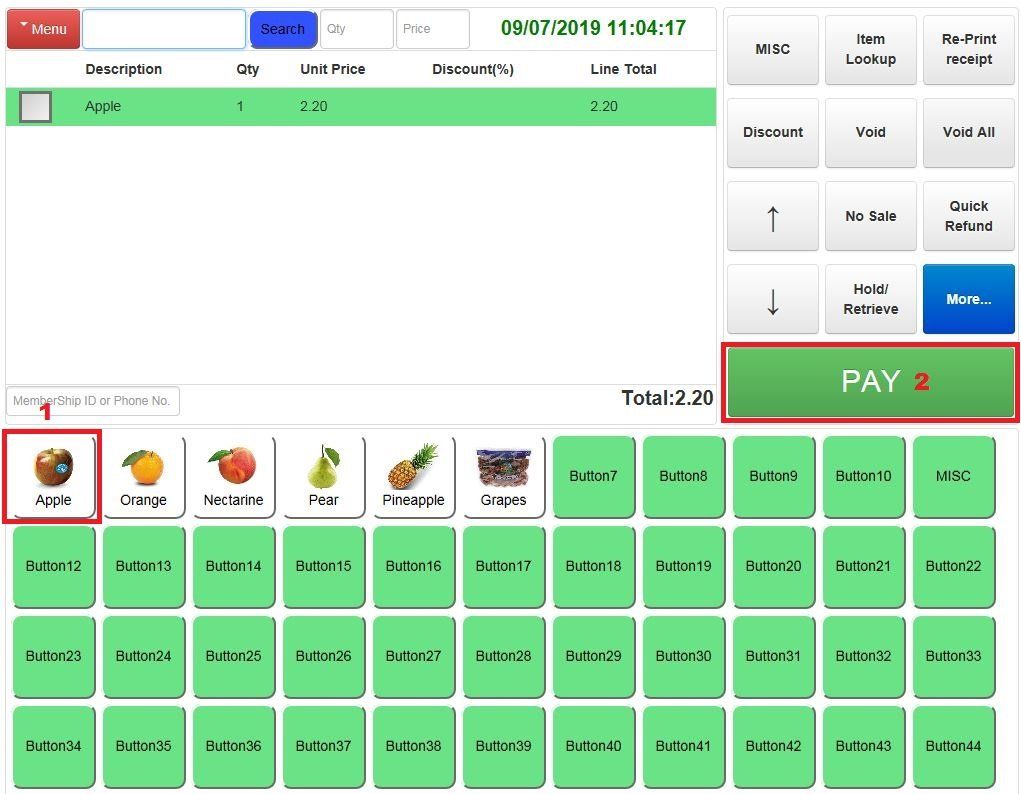
1. On the Sale Page, tap product button(s) as required
2. Tap the PAY
button to start processing payment
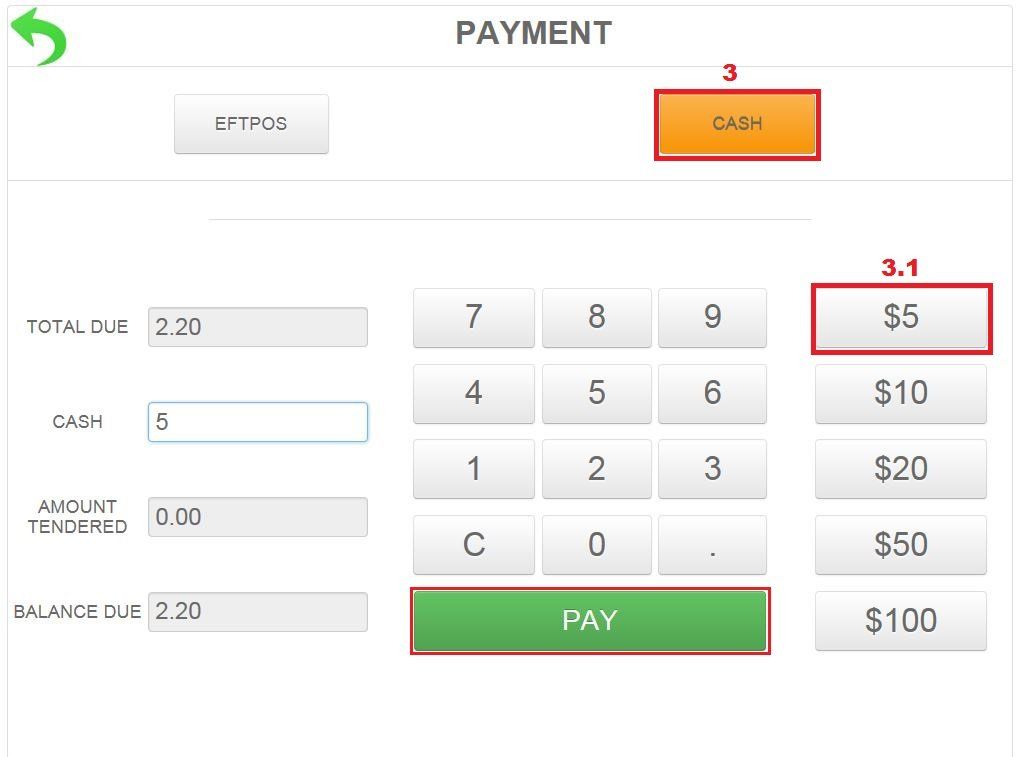
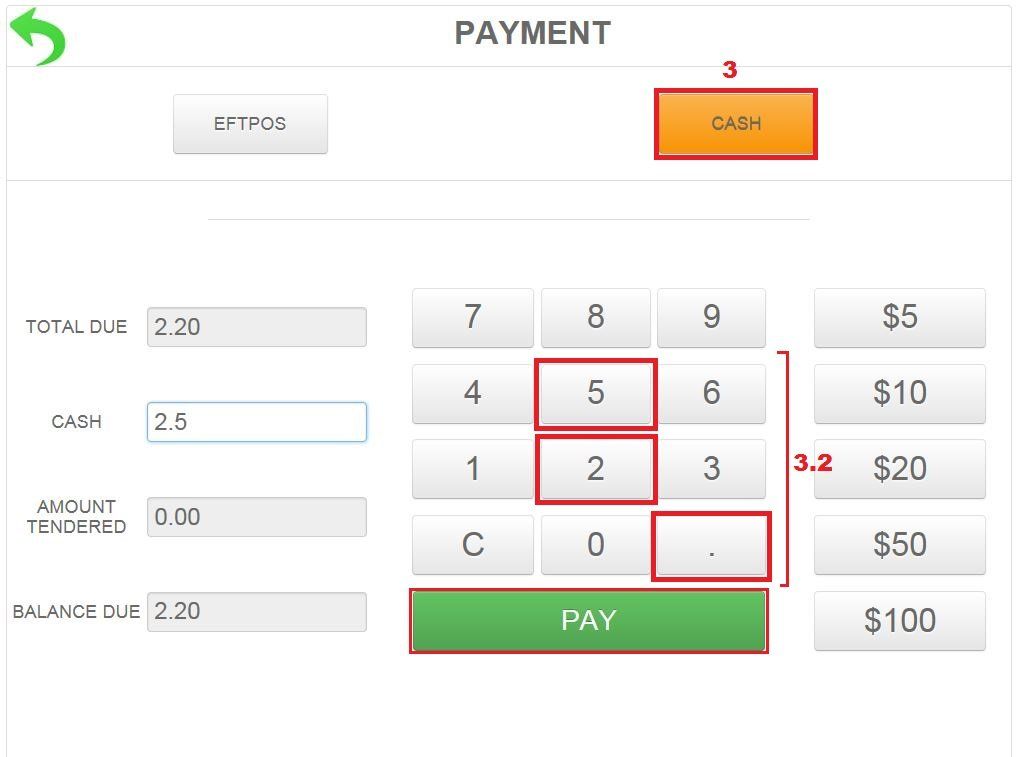
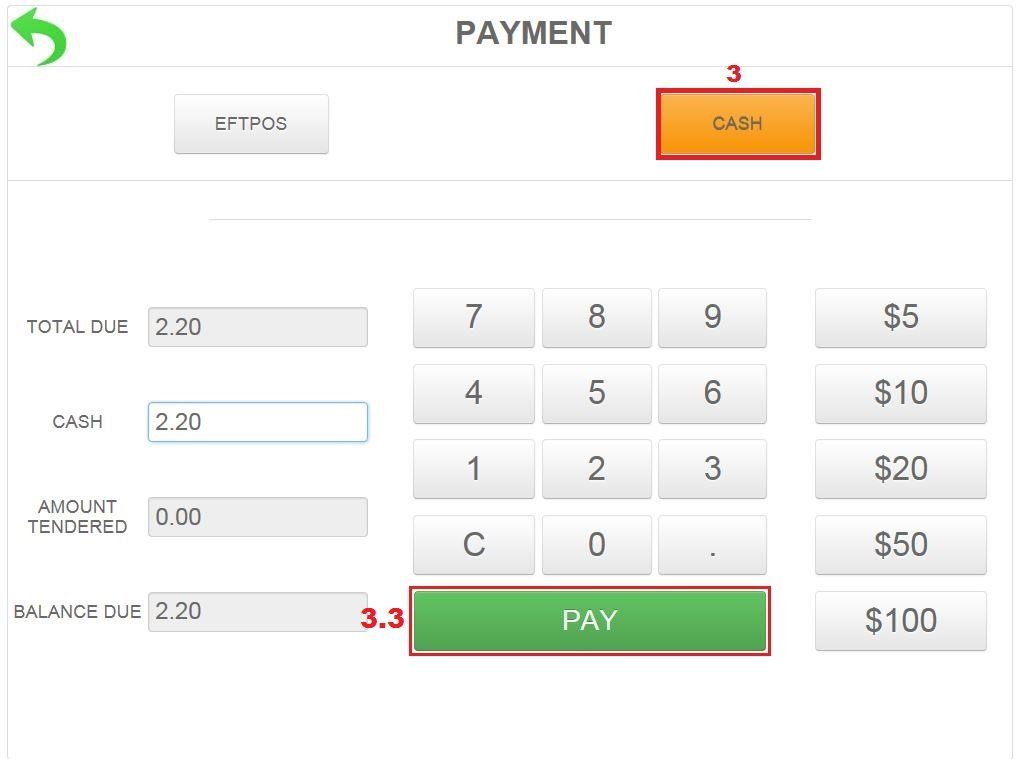
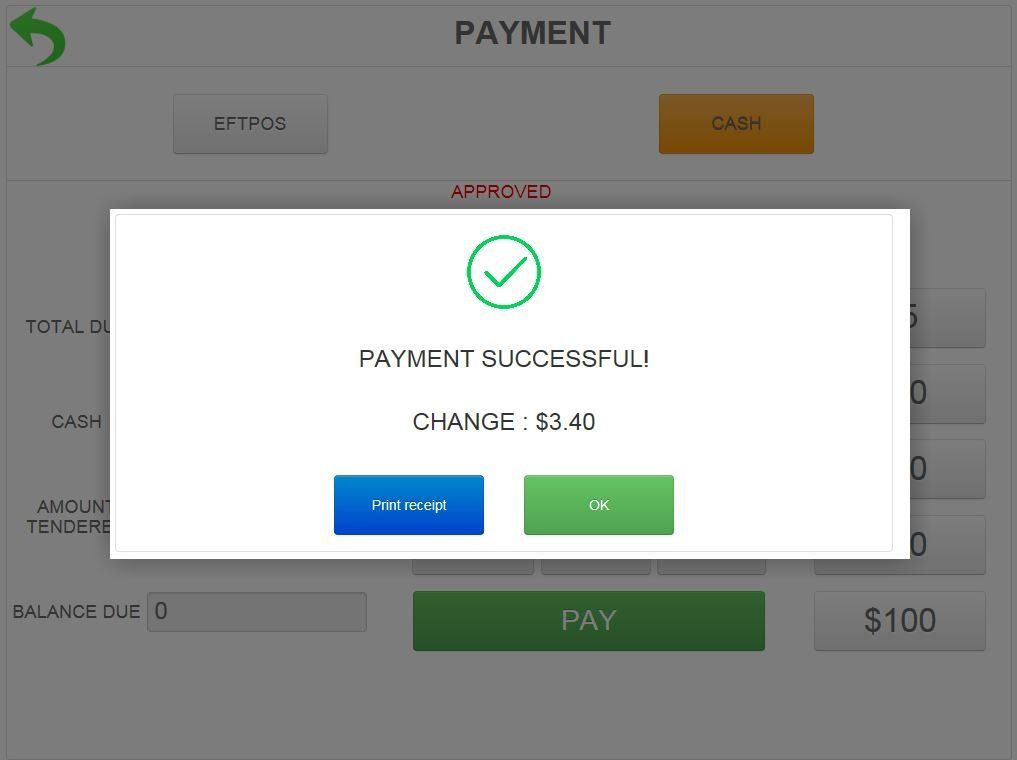
3. At the PAYMENT screen, tap the CASH
button on the top right
You can choose to select the amount depending on what you receive
3.3 Exact amount
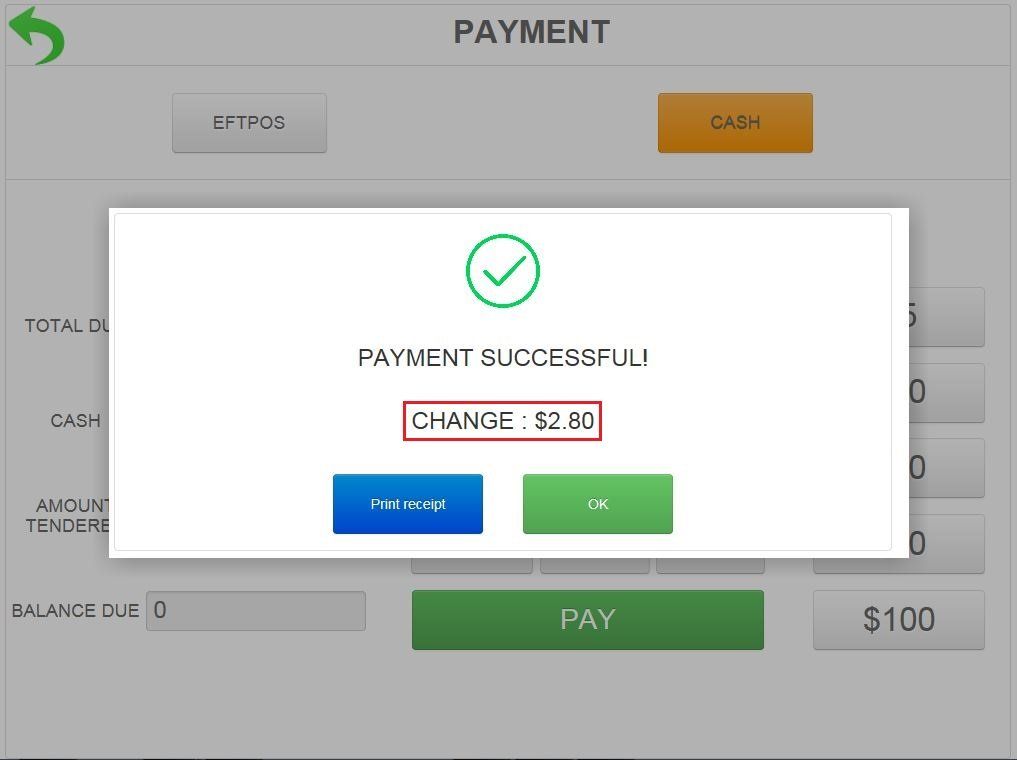
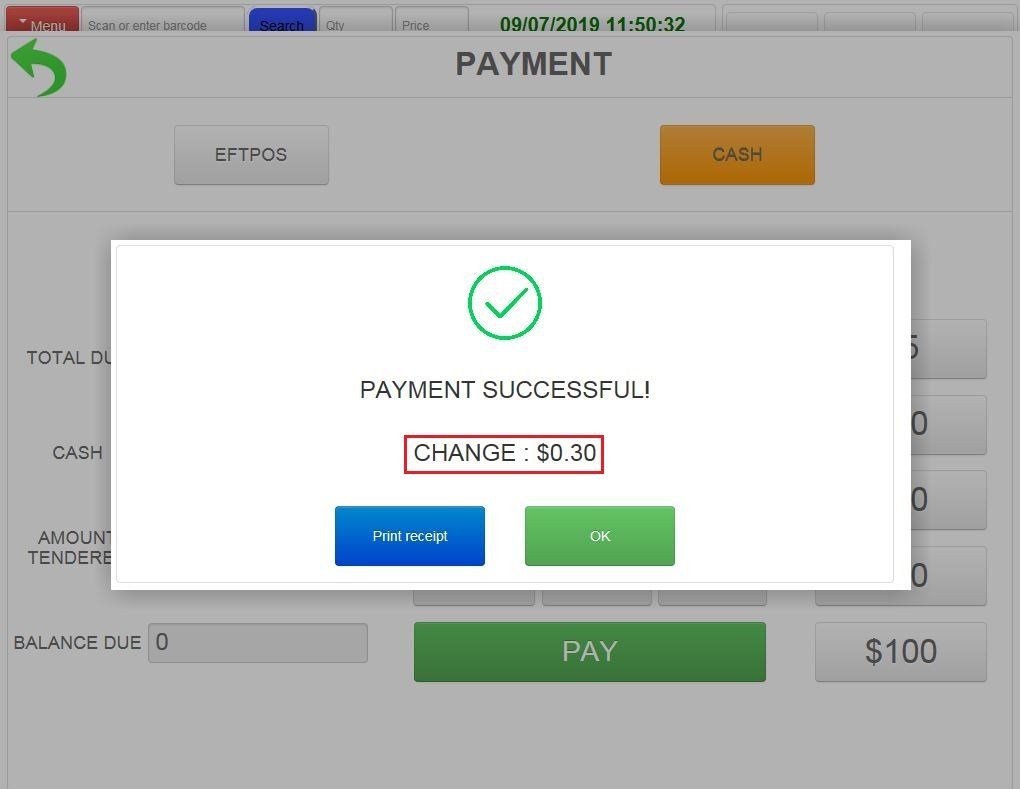
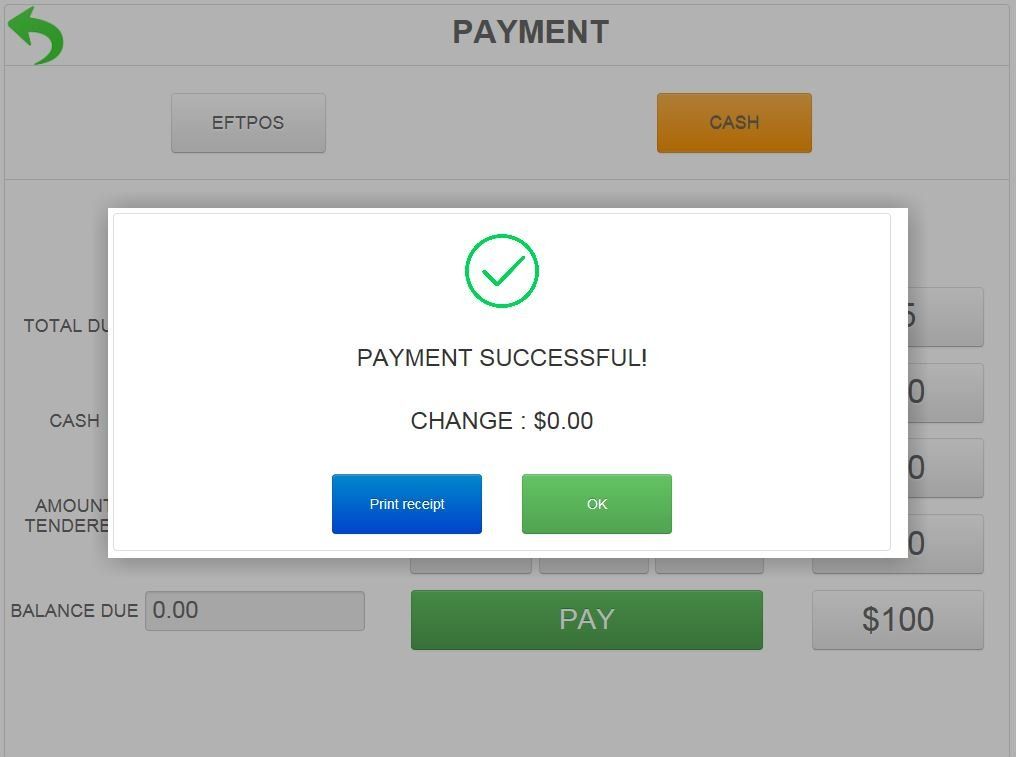
Optionally, tap the Print receipt button if you need a receipt when you completed the transaction, or tap the OK button to return to Sale Page
3.1 Tap on one of the currency denominationamount you receive
e.g. tap $5, then the PAY button. The CHANGE amount of $2.80 window will then pop up
3.2 Manually enter the amount you receive
e.g. Tap 2 . 5 and tap the PAY button, you will then see the CHANGE of $0.30 window
3.3 If you receive an exact amount, simply tap the PAY button
Pay by Eftpos
1. Tap product
button(s) as required
2. Tap the PAY
button to start payment processing
3. Tap the EFTPOS
button
4. Tap the PAY
button to send the amount to the Eftpos terminal (If you have it integrated, otherwise please see supported Eftpos Terminals
and Eftpos Setting
to setup)
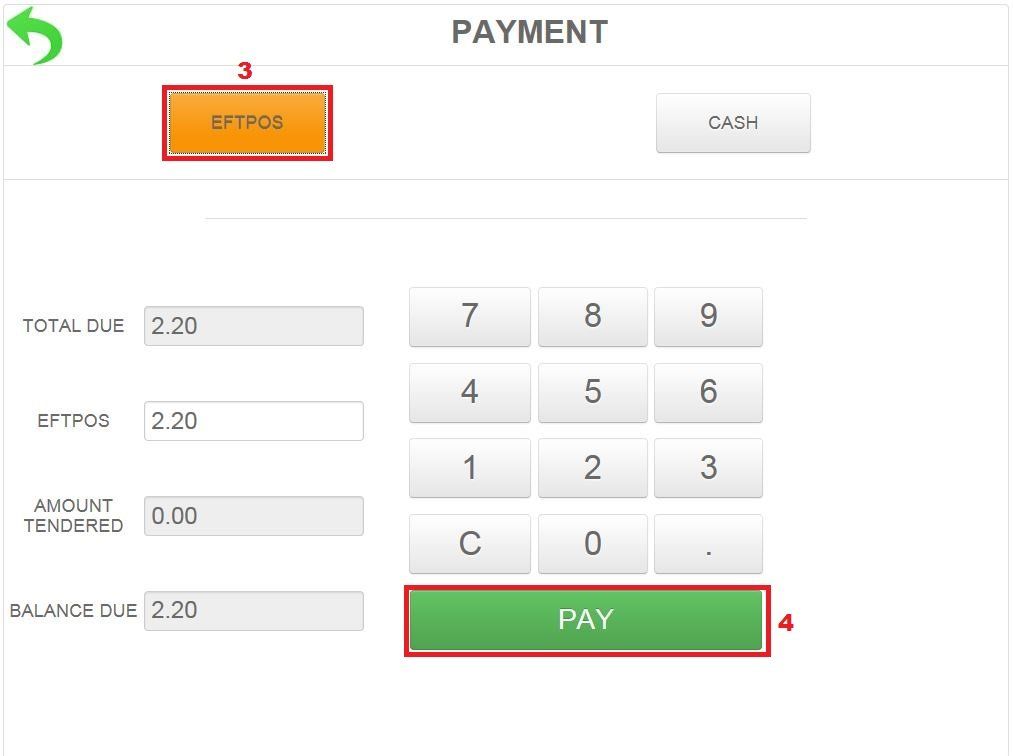
5. Once the transaction has been accepted, tap the OK
button to finish and return to the sale page

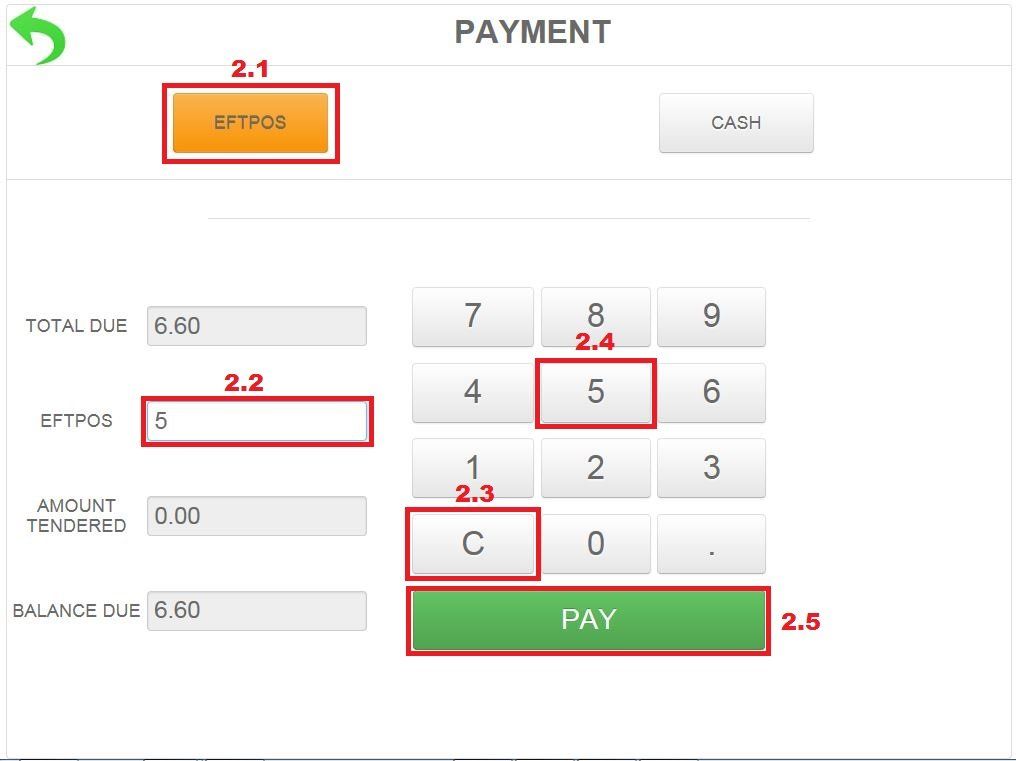
Split Payment
Split payment is the multiple payment options for the same transaction.
E.g. Total payment is $6.60 : customer wants to pay with $5 Eftpos and $5 note
1. Tap the product buttons as required, then tap the PAY
button to start payment processing

2. Tap either the EFTPOS
button or the CASH
button, which ever needs to pay first
2.1 Tap the EFTPOS button2.2 Select the EFTPOS box on the left2.3 Tap the C button to clear the box2.4 Tap the 5 button2.5 Tap the PAY button to complete $5 Eftpos payment
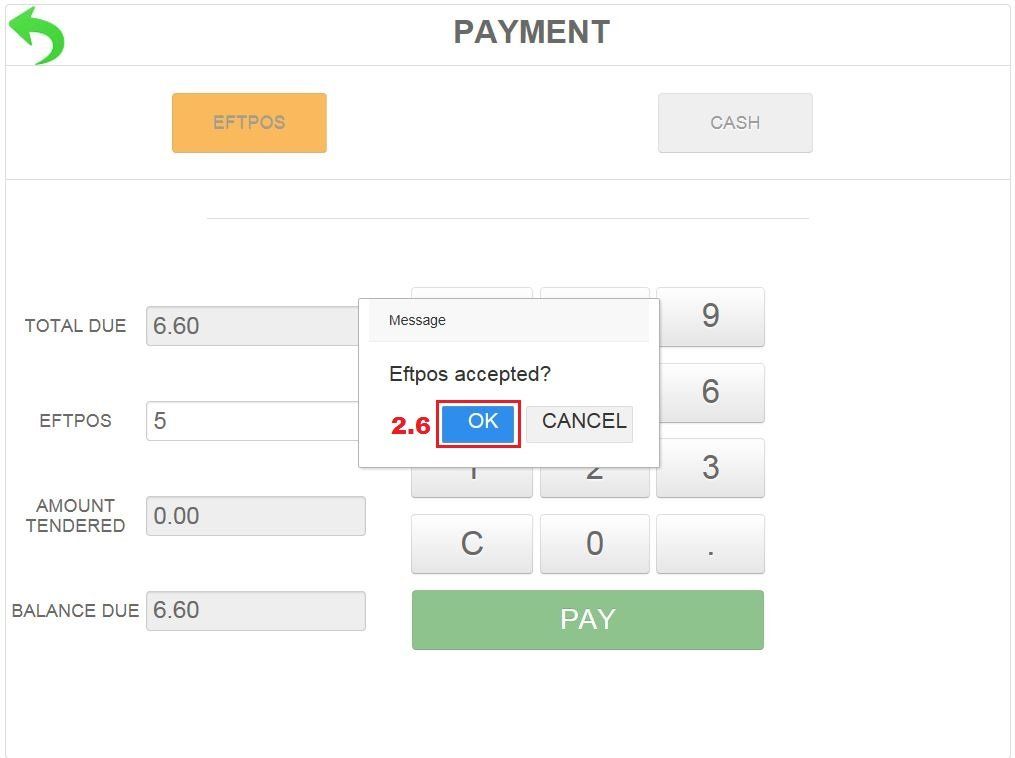
2.6 Tap the OK button to continue with the transaction
2.7 Tap the CASH button to continue the payment with cash2.8 Tap the $5 button2.9 Tap the PAY button to process the transaction
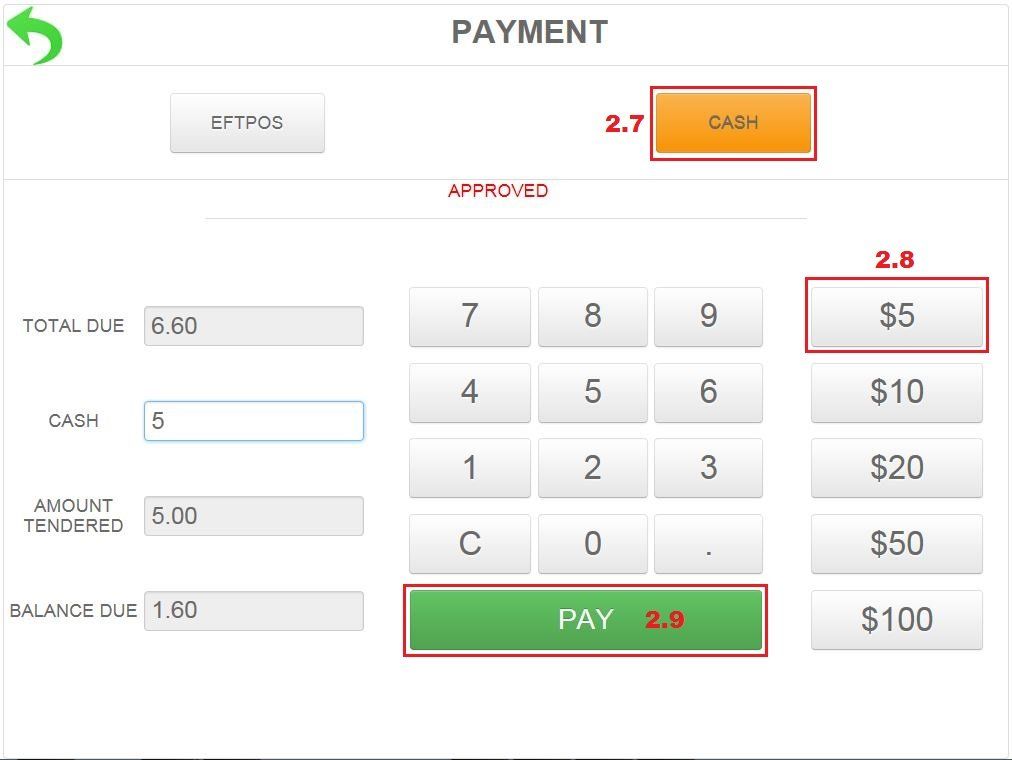
Optionally, tap the Print receipt
button if you need a receipt when you completed the transaction, or tap the OK
button to return to Sale Page
Park Sales (Hold/Retrieve)
Park Sales consist of to Park Sale
(Hold), and to Retrieve Parked Sale
(Retrieve). This function can be used to pause existing transaction and to continue serving the next customer.
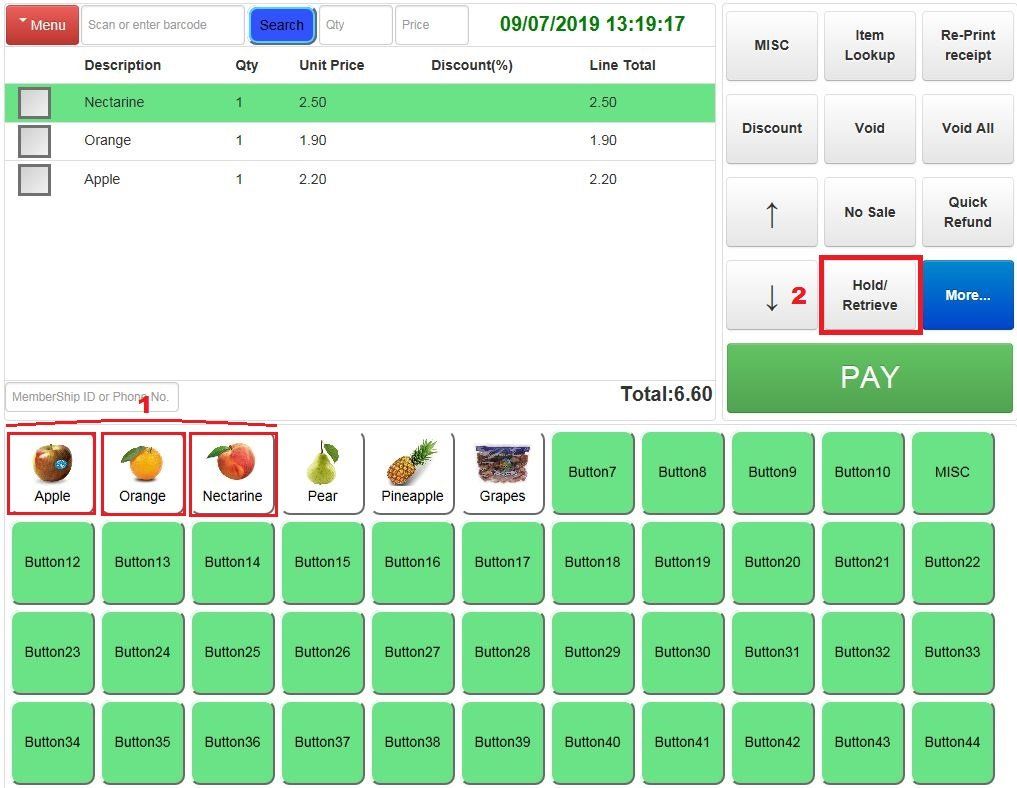
Park Sale
1. From the sale page, tap product button (s) as required
2. Tap the Hold/Retrieve
button
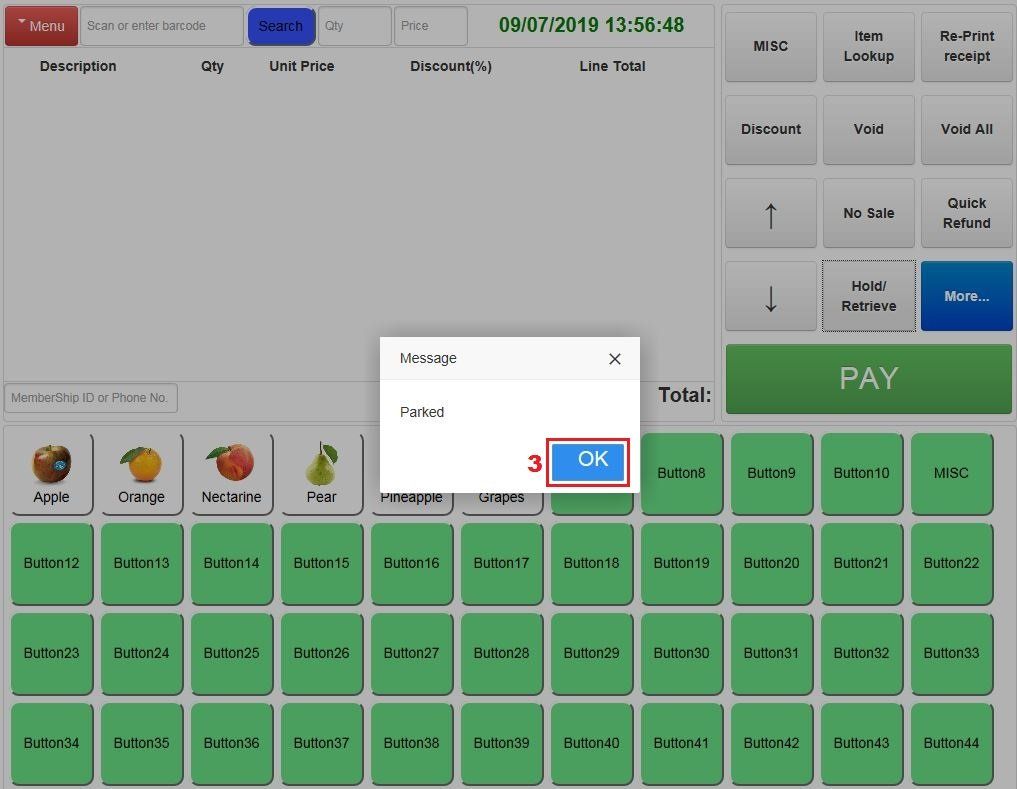
3. Tap the OK
button to continue serving the next customer
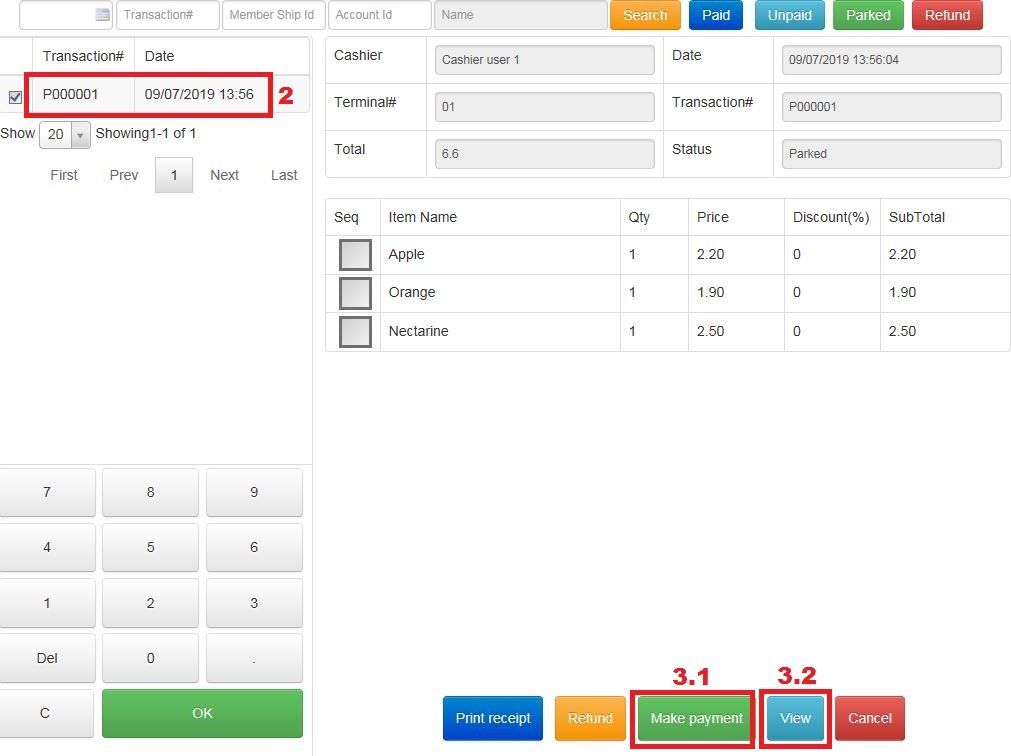
Retrieve Parked Sale
1. From the sale page, tap the Hold/Retrieve
button
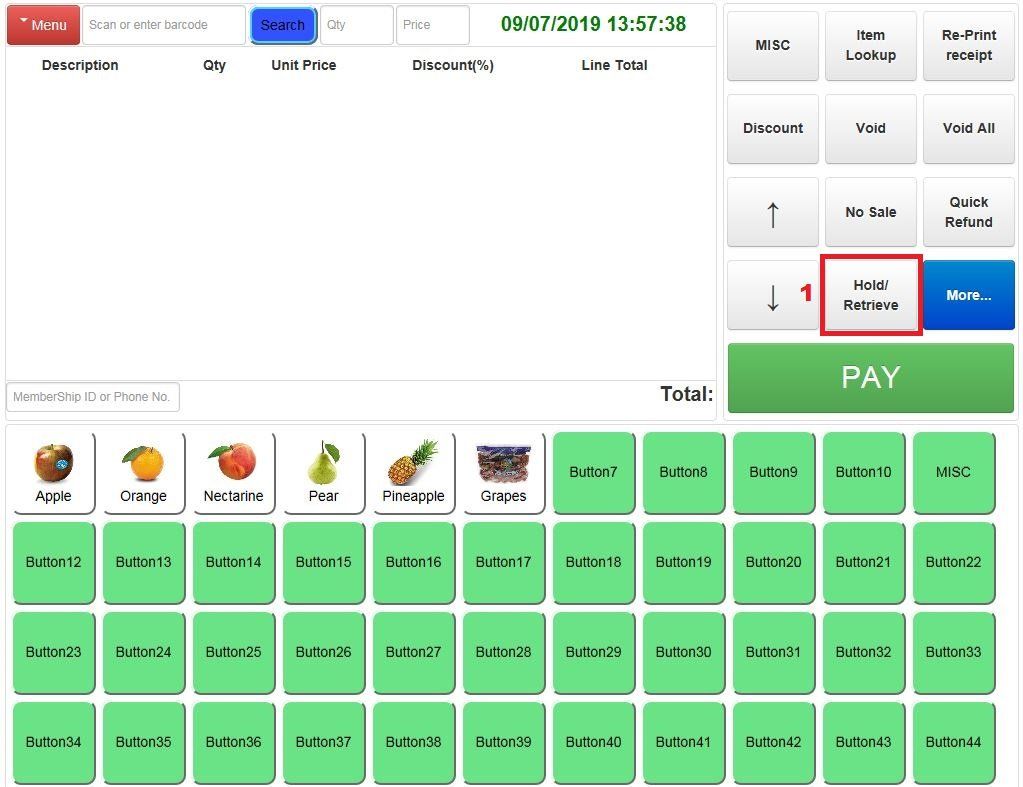
2. Select the transaction on the left menu
3. There are two options here
3.1 Make payment- Click this button if there is no extra item, please see Basic Sales and follow the instructions to complete transaction
3.2 View- Click this button if you need to add more item, then follow the payment process to complete the transaction
Refunds and Exchanges
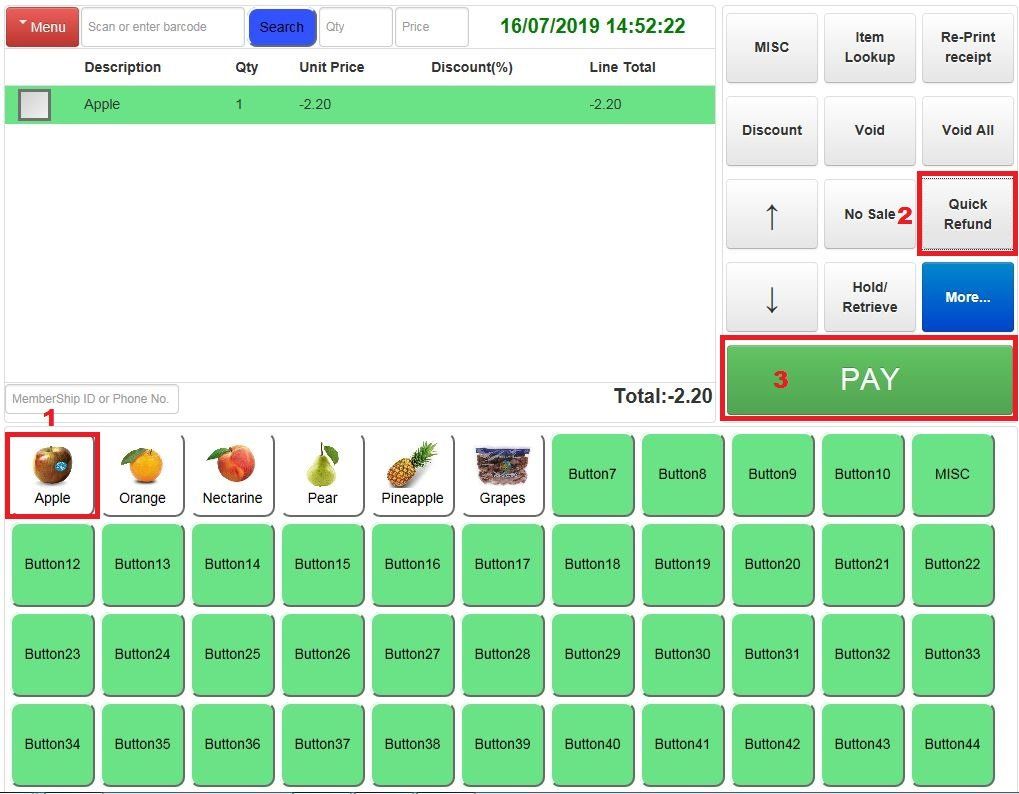
Assuming a customer wants to refund and exchange an apple
Refunds
1. From the sale page, tap the product button your customer would like to refund for
2. Tap the Quick Refund
button, the price of the item shown on the screen will then become minus
3. Tap the PAY
button, then follow the payment process to complete transaction or see Basic Sale
for more information
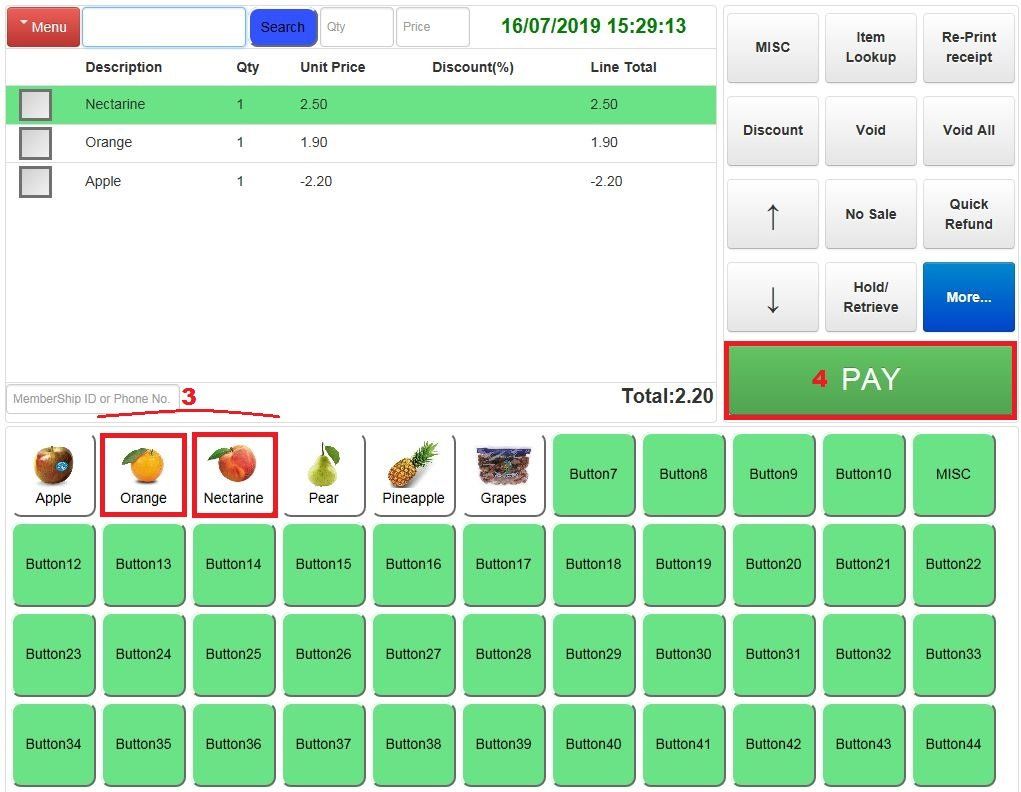
Exchanges
Assuming your customer would like an exchange instead of refund:
3. Once you have tapped the Quick Refund
button, instead of tapping the PAY button,
- you can tap the product button(s) as required
4. Click the PAY
button to start payment process
The POS will then automatically calculate the difference between the Refunds and Sales and only display the final balance, whether you owe your customer the refund (negative) or your customer has a new balance to pay (positive).
Voids
If your customer wants to remove item(s) from the cart during the sale transaction, you can do as follow and continue serving customers
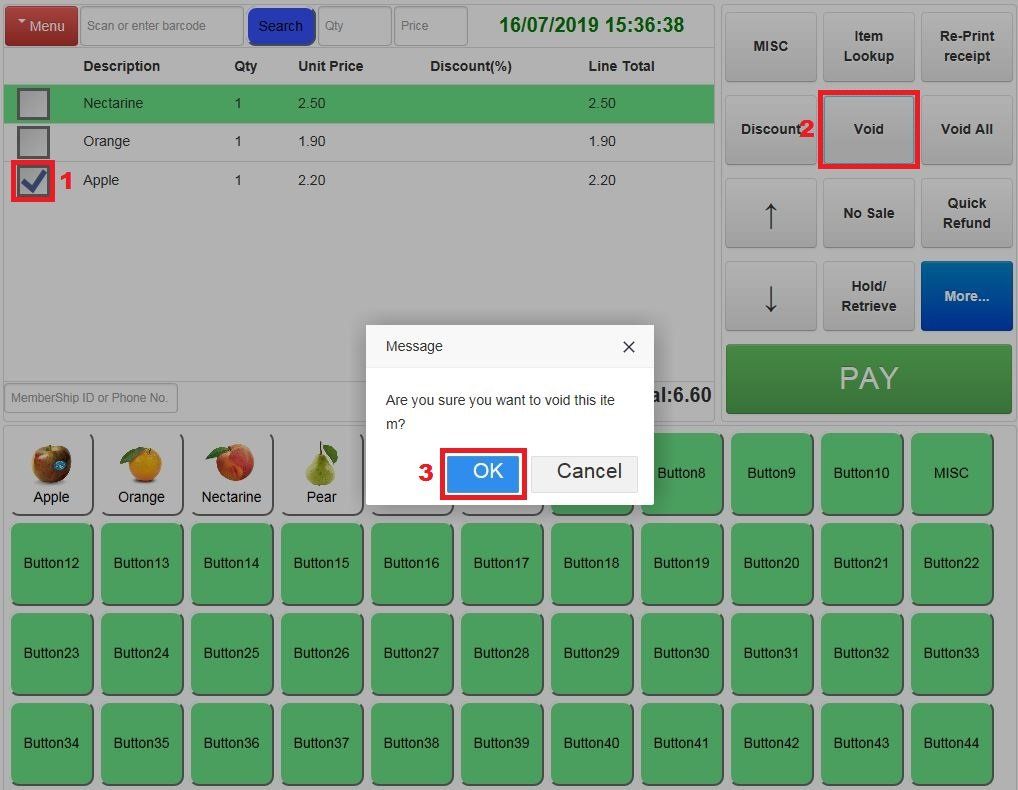
Void Individual Item
Assuming your customer would like to void an apple from the cart
1. After you tapped product button(s) as required, select the square box
in front of the product that needs to be removed
2. Tap the Void
button on the right screen
3. Tap the OK
button to confirm and continue with transaction
NOTE: System can be setup for supervisor authorisation for voiding items/transactions.
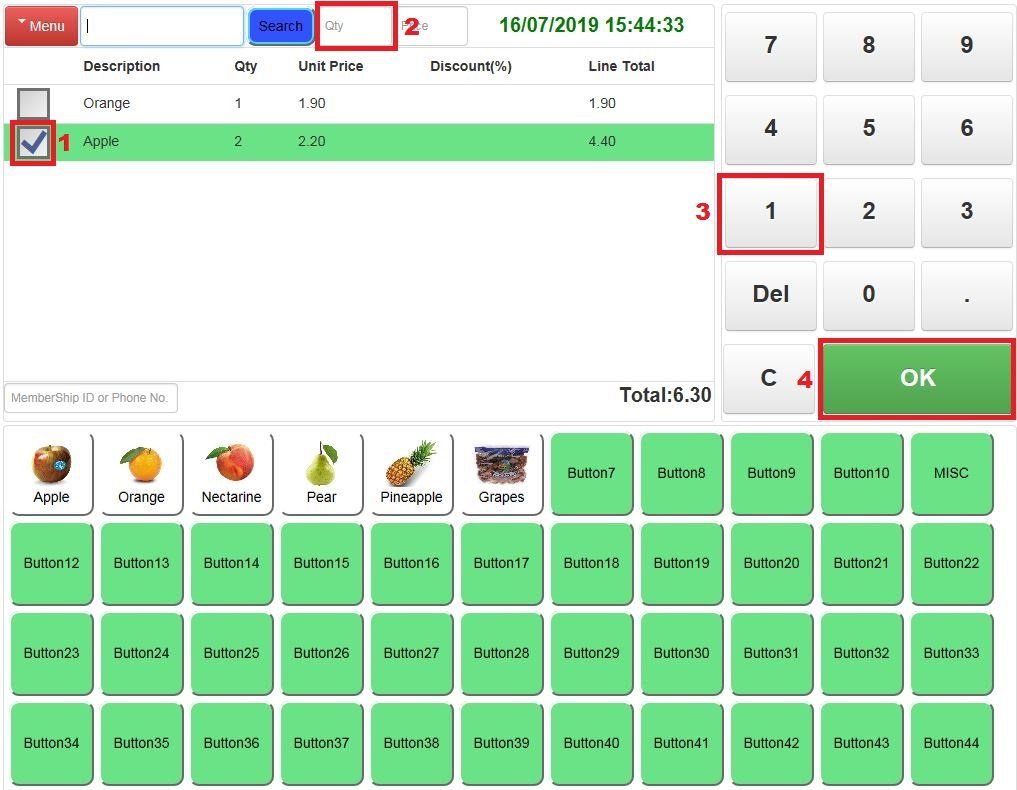
Adjust Qantity
Assuming your customer would like to adjust the quantity of the apple from 2 to 1
1. After you tapped the product button(s) as required and selected the square box
in front of the product
2. Select the Qty
box on the top of the page, the number keys will then appear on the right
3. Tap the number of quantity that needs to be adjusted to (in this case 1)
4. Tap the OK
button to continue with the sale transaction
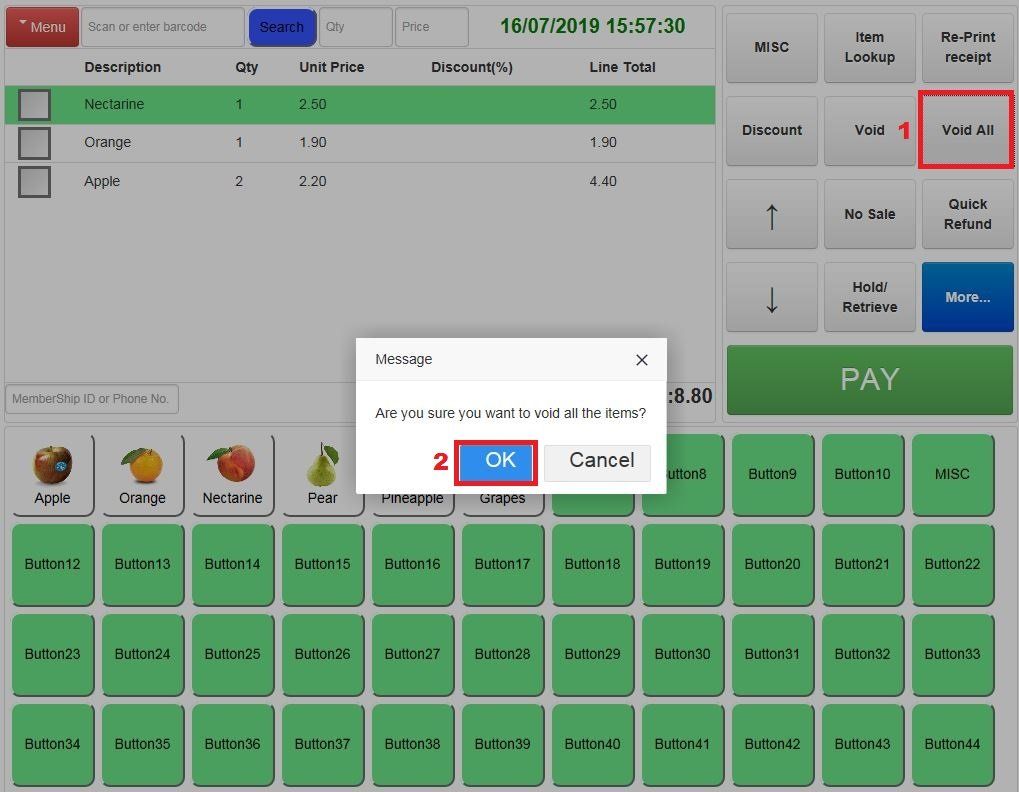
Void All Items
Assuming your customer would like to void all items on the cart
1. After you tapped product button(s) as required, tap the Void
All
button on the right screen
2. Tap the OK
button to confirm and continue serving the customer
NOTE: System can be setup for supervisor authorisation for voiding items/transactions.
Scanning and Weighing
NOTE: this will work only if you have created the product with the scanning /or weighing option,
otherwise please see How to Setup Scanning and Weighing Products.
Scanning
1. From the sale page, use the scanner to scan product barcode
2. Follow the payment process to complete the transaction
Weighing
1. From the sale page, place the product on the scale
2. Tap the product button as required, then follow the payment process to complete the transaction
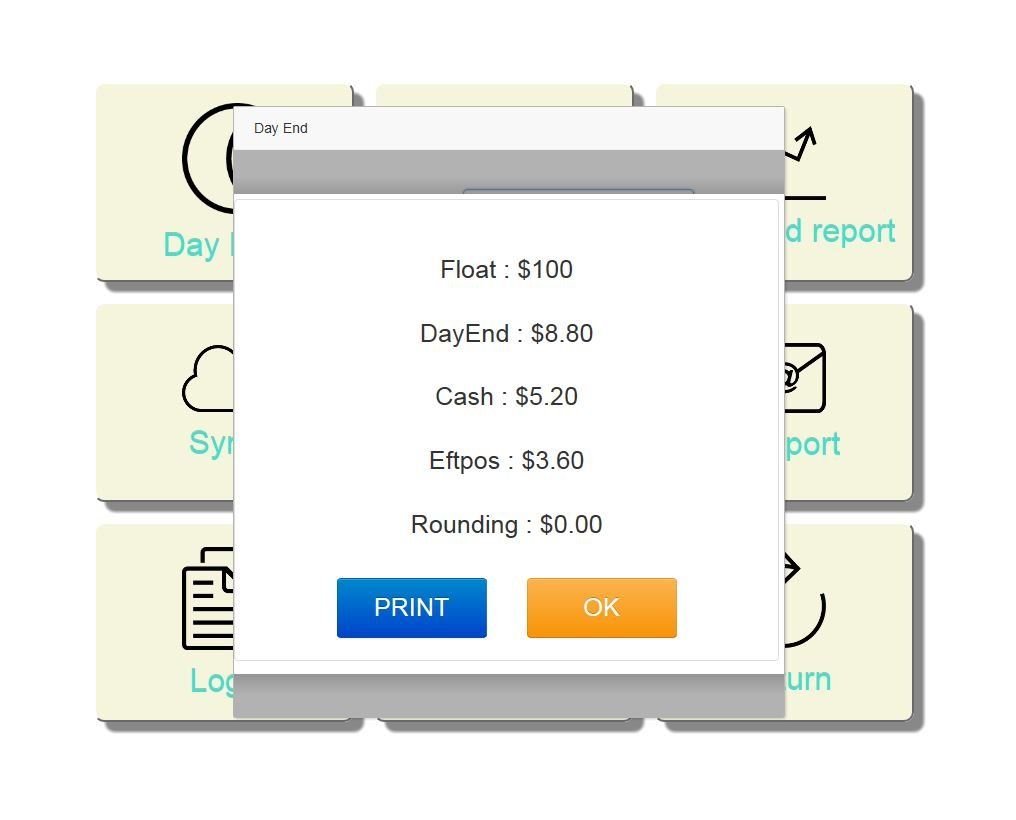
Day End
1. From the sale page, tap the Menu
button
2. Tap Log out
from the drop-down options

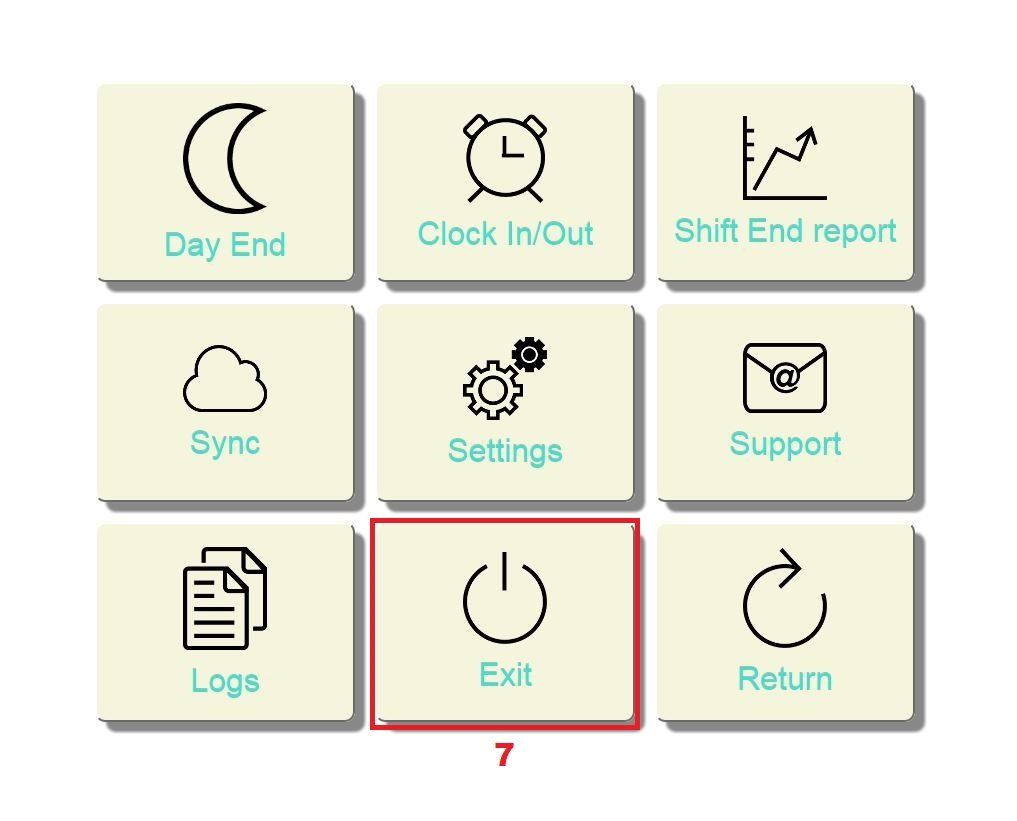
3. Now you are on the Login Page, click the Menu
button on the lower right corner

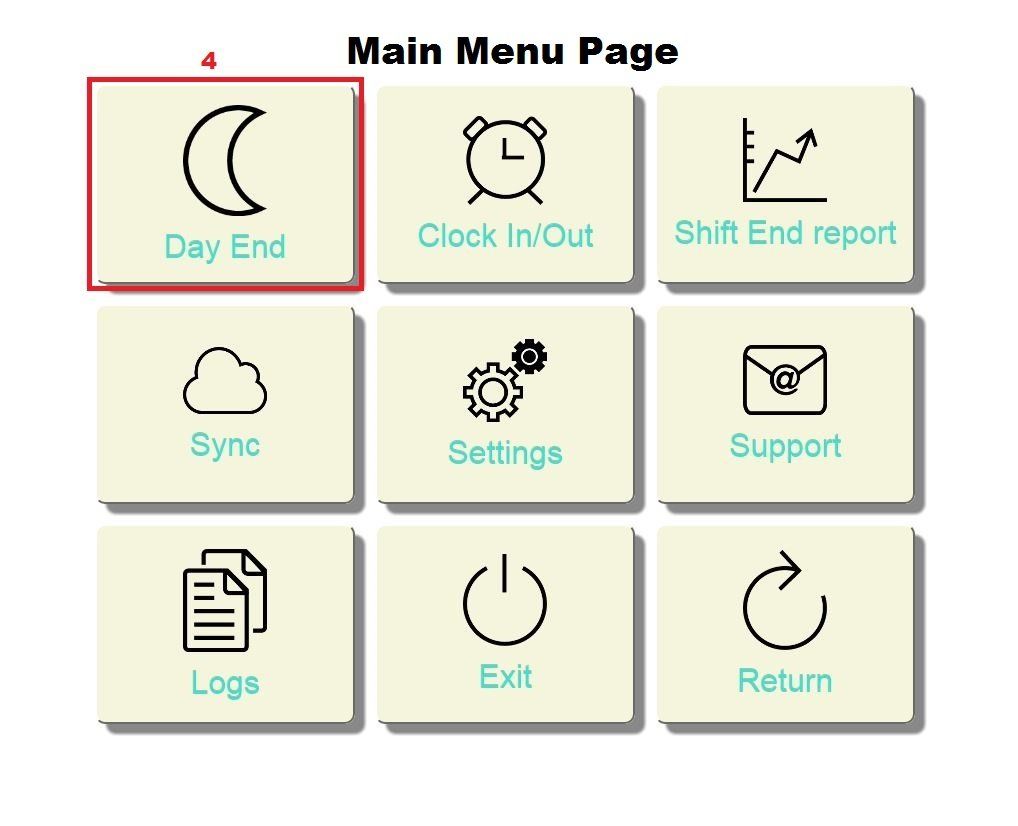
4. On the main menu page, click the Day End
button
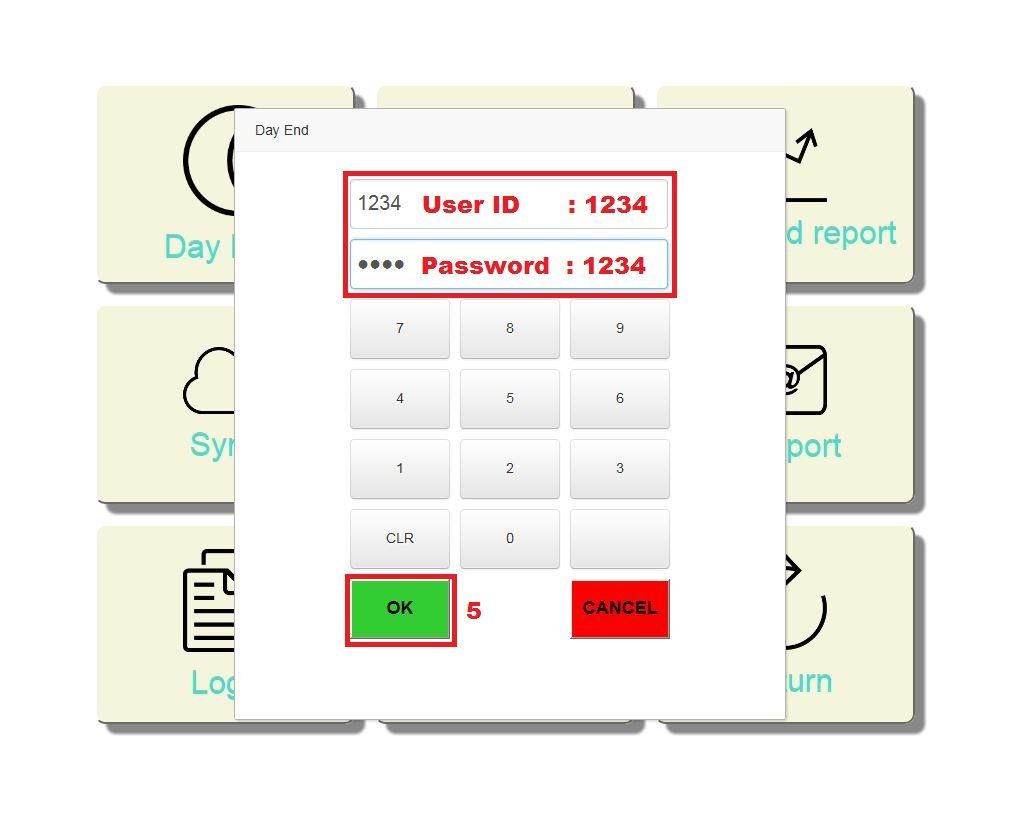
5. Key in the User ID and Password, then click the OK
button
6. The POS will then show you the Day End amount, tap the PRINT
button if you require a paper copy, otherwise tap the OK
button to return to the main menu page
7. Now you are back on the main menu page, tap the Exit
button to close the Monarch POS Retail Software